Overview
Creating your first certificate in CertLister is simple. This step-by-step guide walks you through the entire process, from clicking “Create” to viewing your finished certificate PDF.
Time required: 5-10 minutes
What you’ll need:
- Certificate title (what they completed)
- Recipient’s name
- Recipient’s email (optional)
- Issue date
- Category (optional)
- Certificate PDF (optional, if using your own design)
Before You Start
Delete Sample Data (Recommended)
When you created your account, CertLister added sample certificates for testing. Delete these before creating real certificates:
- Go to Certificates page
- Select all (checkbox at top of table)
- Click “Delete Selected”
- Confirm deletion
This frees up space in your Free tier (50 certificates max) and keeps your data clean.
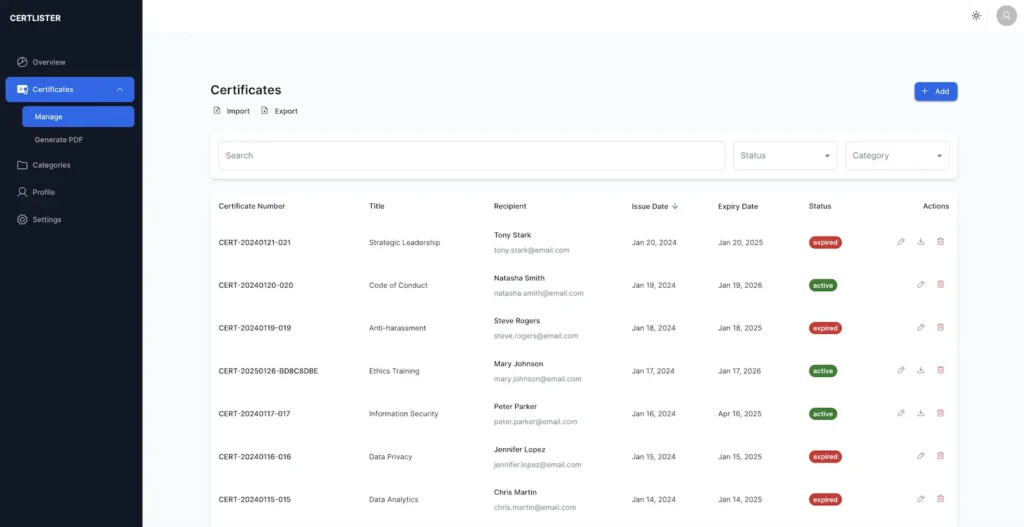
Step-by-Step: Create a Certificate
Step 1: Open the Create Form
- Click “Certificates” in the top navigation
- Click the “+ Create New Certificate” button (top right)
- The certificate creation dialog will appear
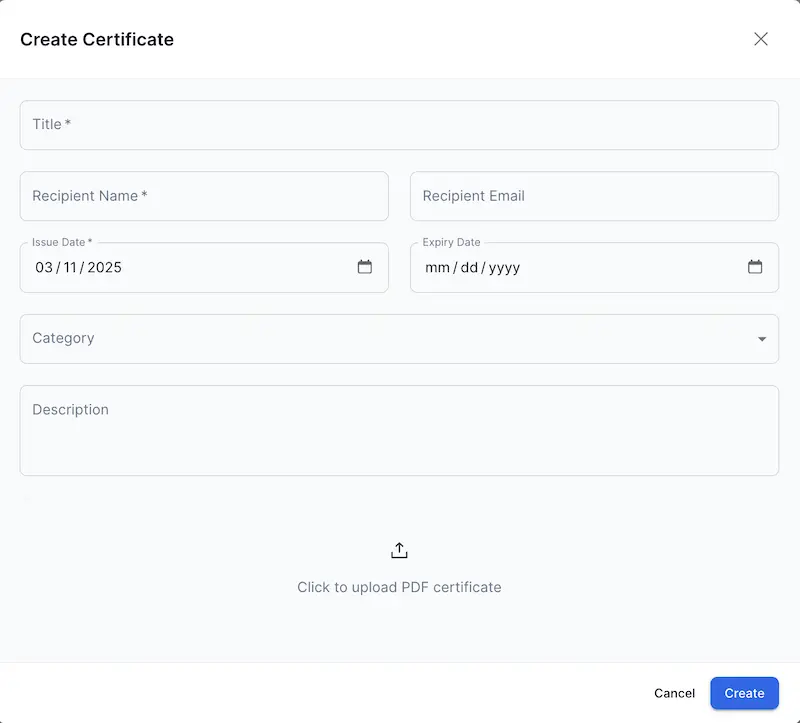
Step 2: Fill Out Certificate Details
You’ll see a form with several fields. Let’s go through each one:
Certificate Title (Required)
What to enter:
- The name of the certification, course, or achievement
- What this certificate is for
Examples:
- CPR Certification
- First Aid Training Completion
- Food Safety Handling Course
- OSHA Safety Training
- Professional Development: Leadership Skills
Tips:
- Be specific and descriptive
- Use title case (Capitalize Important Words)
- Keep it under 100 characters for best display
Recipient Name (Required)
What to enter:
- Full name of the person receiving the certificate
- First and last name
Examples:
- Sarah Johnson
- Michael Chen
- Dr. Emily Rodriguez
Tips:
- Use the person’s legal/official name
- Check spelling carefully (you can edit later if needed)
- Capitalization matters for professional appearance
Recipient Email (Optional)
What to enter:
- Email address of the certificate recipient
- Used for sending certificate PDFs and notifications
Examples:
- sarah.johnson@email.com
- mchen@company.com
- emily.rodriguez@school.edu
Tips:
- Double-check spelling to avoid bounce-backs
- Not required, but useful for future communication
- Email is not displayed on the certificate PDF itself
Why provide it:
- Easier to contact recipient later
- Can be used for automated email delivery (if configured)
- Better record keeping
Category (Optional)
What to enter:
- Choose from your existing categories
- Or leave blank for uncategorized
Examples of categories:
- Safety Training
- Professional Development
- Compliance Certifications
- Vocational Skills
Why categories matter:
- Organize certificates by type
- Filter and search more easily
- Generate category-specific reports
- Better verification experience
To create a new category:
- Go to Categories page in the navigation
- Click “+ Create New Category”
- Enter category name and description
- Save, then return to create your certificate
Issue Date (Required)
What to enter:
- The date the certificate is issued
- Usually today’s date
Default: Today’s date (pre-filled)
To change:
- Click the date field
- Calendar picker appears
- Select the correct date
Common scenarios:
- Training completed today: Use today’s date
- Backdating: If training was completed earlier, select that date
- Future-dating: Not recommended, but possible for scheduled completions
Expiration Date (Optional)
What to enter:
- The date this certificate expires
- Leave blank if the certificate doesn’t expire
Examples:
- CPR certifications: Expire after 2 years
- Food safety: Expire after 1 year
- Some certifications: Never expire (leave blank)
To set an expiration date:
- Click the “Add Expiration Date” checkbox
- Date field appears
- Enter the expiration date
Tips:
- Calculate correctly (e.g., issue date + 2 years for CPR)
- Status will automatically change to “Expired” after this date
- You’ll see upcoming expirations on your dashboard
Certificate Number (Auto-generated)
What it shows:
- Unique identifier for this certificate
- Automatically generated when you save
Format: Usually “CERT-XXXX-XXXX” or similar
What it’s used for:
- Public verification (employers enter this number)
- Internal tracking
- Prevents duplicates
You cannot edit this – it’s created automatically to ensure uniqueness.
Description/Notes (Optional)
What to enter:
- Additional details about the certificate
- Internal notes
- Not visible on the certificate PDF
Examples:
- “Completed 8-hour in-person training on June 15, 2025”
- “Instructor: John Davis”
- “Perfect score on final exam”
Who sees this:
- Your organization (internal use)
- Not shown on the certificate itself
- Visible in verification portal (if you enable it)
PDF Upload (Optional)
What to upload:
- Your own pre-made certificate PDF
- Alternative to using CertLister’s certificate generator
- Maximum file size: 10MB
When to use this:
- You already have a certificate PDF designed externally
- You want to use custom branding/design not available in templates
- You’re importing existing certificates into CertLister
File requirements:
- Format: PDF only
- Size: Maximum 10MB per file
- Content: Should include recipient name, title, and certificate number for verification
How to upload:
- Click the “Upload PDF” button or drag-and-drop area
- Select your PDF file from your computer
- File name will appear after successful upload
- You can remove and replace the PDF before saving
Note: If you upload a PDF, CertLister will use your PDF instead of generating one from templates. You can still change this later by using the Certificate Generator page.
Step 3: Review Your Information
Before saving, double-check:
✅ Certificate title – Accurate and professional?
✅ Recipient name – Spelled correctly?
✅ Recipient email – Correct email address (if provided)?
✅ Issue date – Right date?
✅ Expiration date – Calculated correctly (if applicable)?
✅ Category – Correct classification (if selected)?
✅ PDF upload – Correct file uploaded (if applicable)?
Note about templates: Certificate design templates (Classic, Modern, Elegant) are not selected during certificate creation. Templates are assigned later using the Certificate Generator page. If you uploaded your own PDF, that will be used instead.
Step 4: Click “Create Certificate”
- Click the “Create Certificate” button at the bottom of the form
- CertLister will:
- Validate your information
- Generate the certificate PDF
- Upload it to secure cloud storage
- Add it to your database
- Assign a unique certificate number
This takes 2-5 seconds.
You’ll see a success message: “Certificate created successfully!”
What Happens Next?
You’ll Be Redirected to Certificate Details
After creation, you’ll see the certificate details page showing:
- All the information you entered
- Certificate number
- Status (Active)
- View PDF button
- Edit and Delete options
View Your Certificate PDF
To see the certificate:
- Click the “View PDF” or “Download PDF” button
- PDF opens in a new tab or downloads
What you’ll see:
- Professional certificate with your template design
- Recipient name prominently displayed
- Certificate title
- Issue date
- Your organization name
- Unique certificate number (for verification)
The Certificate is Now Active
Your certificate is immediately:
✅ Searchable – In your Certificates page
✅ Verifiable – In your public verification portal
✅ Tracked – On your dashboard statistics
✅ Downloadable – PDF available anytime
What to Do with Your Certificate
Option 1: Download and Email to Recipient
Steps:
- Download the PDF from the certificate details page
- Email it to the recipient as an attachment
- Include verification instructions (see below)
Option 2: Print and Mail
Steps:
- Download the PDF
- Print on quality paper (cardstock recommended)
- Mail to recipient
Printing tips:
- Use color printer for best results
- Cardstock paper (80-110 lb) looks professional
- Consider printing 2 copies (one for recipient, one for your files)
Option 3: Bulk Distribution
If you issue many certificates at once:
- Use bulk import (faster than creating one-by-one)
- Batch download PDFs
- Send via email automation tools
Include Verification Instructions
When you send certificates, include instructions for verification:
Example email:
Dear Sarah,

Congratulations on completing CPR Certification!

Attached is your official certificate. Your unique certificate number is: CERT-1234-5678

Employers can verify this certificate anytime at:
https://certlister.com/verify

Simply enter your certificate number or name to confirm authenticity.

Best regards,
[Your Organization]
Why this matters:
- Employers can instantly verify without contacting you
- Prevents certificate fraud
- Saves you time answering verification requests
Learn more: Certificate Verification →
Edit Your Certificate
Need to make changes?
- Go to Certificates page
- Find the certificate (use search if needed)
- Click the edit icon or open certificate details
- Click “Edit Certificate”
- Make changes
- Click “Save Changes”
What you can edit:
- Recipient name
- Certificate title
- Category
- Issue date
- Expiration date
- Description/notes
What you cannot edit:
- Certificate number (permanently assigned)
Note: Editing certificate information doesn’t automatically update the PDF. If you need a new PDF with updated information, you can:
- Use the Certificate Generator page to create a new PDF with a template
- Upload a new PDF file
- Delete and recreate the certificate
Delete Your Certificate
Made a mistake? Need to remove a certificate?
- Open the certificate details page
- Click “Delete Certificate”
- Confirm deletion
⚠️ Warning: This action cannot be undone.
What happens when deleted:
- Certificate removed from your database
- No longer appears in verification searches
- PDF deleted from cloud storage
- Frees up space in your plan limit
Alternative to deleting: Revoke the certificate instead. Revoked certificates remain in your records but show as “Invalid” in verification.
Troubleshooting
“Title is required” or “Recipient name is required”
Problem: You didn’t fill in required fields.
Solution:
- Enter a certificate title
- Enter the recipient’s name
- Both fields are mandatory
“Invalid date”
Problem: Date field shows an error.
Solutions:
- Use the calendar picker (don’t type dates manually)
- Ensure expiration date is after issue date
- Check date format (should match your locale)
“Certificate number already exists”
Problem: Rare, but possible if there’s a system issue.
Solution:
- This usually auto-resolves (certificate numbers are auto-generated)
- Try saving again
- Contact support if it persists
PDF not generating
Problem: Certificate created but PDF fails to generate.
Solutions:
- Refresh the page and try viewing again
- Check your internet connection
- Try a different browser
- Contact support if PDF consistently fails
More help: Certificate PDF Problems →
“File too large” when uploading PDF
Problem: PDF file exceeds the 10MB size limit.
Solutions:
- Compress the PDF using online tools or Adobe Acrobat
- Reduce image quality in the PDF
- Remove unnecessary pages or content
- Use a maximum of 10MB per certificate PDF
PDF upload failed
Problem: PDF file won’t upload or shows an error.
Solutions:
- Ensure file is actually a PDF (not renamed image or document)
- Check file isn’t corrupted (try opening it first)
- Try a different browser
- Refresh the page and try again
- Contact support if problem persists
Tips for Creating Multiple Certificates
After Group Training
Scenario: 20 students completed CPR training.
Option A: Create one-by-one
- Good for small groups (under 10)
- Takes about 2-3 minutes per certificate
- Total time: 40-60 minutes for 20 certificates
Option B: Bulk import (recommended)
- Create a CSV file with all 20 names
- Import in one upload
- Total time: 10-15 minutes for 20 certificates
- Much faster!
Standardize Your Naming
Be consistent with:
- Certificate titles (e.g., always “CPR Certification,” not sometimes “CPR Training”)
- Category names
- Date formats
- Capitalization
Why it matters:
- Easier to search and filter
- More professional appearance
- Better reporting
Use Expiration Dates
Even if not required, consider setting expiration dates:
Benefits:
- Automatic status updates (Active → Expired)
- Dashboard warnings before expiration
- Encourage renewal training
- Compliance tracking
Example expiration periods:
- CPR: 2 years
- First Aid: 3 years
- Food Safety: 1 year
- OSHA: Varies by certification
Next Steps
1. Create a Few More Certificates
Practice makes perfect:
- Test different categories
- Experiment with expiration dates
- Try uploading custom PDFs
2. Use the Certificate Generator
Create professional certificates with templates:
- Choose from Classic, Modern, or Elegant templates
- Customize with your branding
- Generate PDFs for existing certificates
3. Share Verification Portal
Let employers know they can verify certificates:
- Add verification link to your website
- Include in email signatures
- Print on certificate PDFs
Read: Certificate Verification →
4. Set Up Bulk Import
If you’ll issue many certificates:
- Learn the CSV format
- Prepare your data
- Import in batches


