Overview
Import hundreds of certificates at once using a CSV file. Much faster than creating certificates one at a time.
Time savings: Import 100 certificates in 5 minutes (vs. 5+ hours manually)
Skill level: Basic (Excel/Google Sheets knowledge required)
When to Use Bulk Import
Ideal Scenarios
✅ Migrating from another system – Have existing certificate data
✅ After group training – 20+ students completed the same course
✅ Historical certificates – Adding past certificates to your system
✅ Recurring certifications – Annual renewals for many people
✅ Large events – Conferences, workshops with many participants
When NOT to Use Bulk Import
❌ Single certificates – Faster to create manually
❌ Under 10 certificates – Not worth setting up CSV
❌ Complex customization – Each certificate needs unique details
❌ First time user – Create a few manually first to understand the process
Before You Start
Requirements
You’ll need:
- Certificate data in Excel, Google Sheets, or CSV format
- Basic spreadsheet skills
- 30-60 minutes to prepare your data
Available on:
- ✅ Free tier (up to 50 certificates total)
- ✅ Pro tier (unlimited certificates)
- ✅ Enterprise tier (unlimited certificates)
Data Quality Check
Before importing, verify:
- [ ] All names are spelled correctly
- [ ] Dates are in correct format
- [ ] Category names match your existing categories
- [ ] No duplicate entries
- [ ] No blank required fields
Tip: Start with a small test batch (5-10 certificates) before importing hundreds.
CSV File Format
Required Columns (8 Total)
Your CSV must have these 8 columns in exact order:
| # | Column Name | Description | Required? | Example |
|---|---|---|---|---|
| 1 | Certificate Number | Unique ID (leave blank for new certificates) | Optional | CERT-2025-001 |
| 2 | Title | What they completed | Required | CPR Certification |
| 3 | Recipient Name | Full name of person | Required | Sarah Johnson |
| 4 | Recipient Email | Email address | Optional | sarah@email.com |
| 5 | Issue Date | When issued (YYYY-MM-DD) | Required | 2025-01-15 |
| 6 | Expiry Date | When it expires (YYYY-MM-DD) | Optional | 2027-01-15 |
| 7 | Status | Certificate status | Optional | active |
| 8 | Category | Certificate category | Optional | Safety Training |
Important: All 8 columns must be present, even if some cells are empty.
Column Details
1. Certificate Number
- When to use: Updating existing certificates
- For new certificates: Leave blank (system generates automatically)
- Format: Any unique string (e.g., CERT-2025-001)
- Example: If you have existing certificates and want to update data, include their certificate numbers
2. Title (Required)
- What it is: The certification name or achievement
- Examples: “CPR Certification”, “First Aid Training”, “Food Safety Handler”
- Tips: Be specific and consistent with naming
3. Recipient Name (Required)
- Format: Full name (first and last)
- Examples: “Sarah Johnson”, “Dr. Michael Chen”, “Emily Rodriguez”
- Tips: Check spelling carefully – this appears on the certificate
4. Recipient Email (Optional)
- Format: Valid email address
- Examples: “sarah@email.com”, “mchen@company.com”
- Used for: Future communication, notifications
- Can be blank: Yes
5. Issue Date (Required)
- Format: YYYY-MM-DD (strict format)
- Examples: “2025-01-15”, “2024-12-31”
- Invalid: “01/15/2025”, “January 15 2025”
6. Expiry Date (Optional)
- Format: YYYY-MM-DD (same as issue date)
- Examples: “2027-01-15”, “2026-06-30”
- Can be blank: Yes (certificate never expires)
- Validation: Must be after issue date
7. Status (Optional)
- Valid values:
active– Certificate is validexpired– Certificate has expiredrevoked– Certificate was revoked- Default if blank:
active - Case-insensitive: “Active”, “ACTIVE”, “active” all work
8. Category (Optional)
- Format: Category name (must match existing categories)
- Examples: “Safety Training”, “Compliance”, “Professional Development”
- If category doesn’t exist: See “Category Handling” section below
- Can be blank: Yes (certificate will be uncategorized)
Example CSV File
Correct format (all 8 columns):
Certificate Number,Title,Recipient Name,Recipient Email,Issue Date,Expiry Date,Status,Category
,CPR Certification,Sarah Johnson,sarah@email.com,2025-01-15,2027-01-15,active,Safety Training
,First Aid Training,Michael Chen,mchen@company.com,2025-01-15,2028-01-15,active,Safety Training
,Food Safety Handler,Emily Rodriguez,emily@school.edu,2025-01-10,2026-01-10,active,Compliance
CERT-2024-789,OSHA 10-Hour,David Kim,,2025-01-12,,,Safety Training
,CPR Certification,Maria Garcia,,2025-01-15,2027-01-15,active,Safety Training
Notes on this example:
- First 3 rows: New certificates (blank Certificate Number)
- Row 4: Updating existing certificate CERT-2024-789
- Row 4: No email, no expiry date, no status (defaults to active)
- Row 5: No email provided
Step-by-Step Guide
Step 1: Prepare Your Data in Excel/Google Sheets
1. Open your spreadsheet program
- Excel, Google Sheets, or LibreOffice Calc
2. Create column headers (exact order and spelling matter):
- Certificate Number
- Title
- Recipient Name
- Recipient Email
- Issue Date
- Expiry Date
- Status
- Category
3. Add your data row by row
Step 2: Format Dates Correctly
Critical: Dates must be in YYYY-MM-DD format.
Correct:
- 2025-01-15
- 2024-12-31
- 2026-06-01
Incorrect (will cause errors):
- 01/15/2025 (wrong format)
- January 15, 2025 (wrong format)
- 15-01-2025 (wrong order)
How to format in Excel:
- Select date columns
- Right-click → Format Cells
- Choose “Custom”
- Enter format:
yyyy-mm-dd - Click OK
Step 3: Verify Category Names
Important: Category names in your CSV must exactly match existing categories in CertLister.
Check your categories:
- Log into CertLister
- Go to Categories page
- Note exact spelling (including capitalization)
Example:
- ✅ Correct: “Safety Training”
- ❌ Wrong: “safety training” (lowercase)
- ❌ Wrong: “Safety Trainings” (extra s)
New categories:
- If a category doesn’t exist, CertLister will prompt you to choose an action
- See “Category Handling Dialog” section below for details
Step 4: Save as CSV
In Excel:
- Click File → Save As
- Choose file type: CSV (Comma delimited) (*.csv)
- Name your file (e.g., “certificates_jan2025.csv”)
- Click Save
- If Excel warns about features, click Yes (CSV format is correct)
In Google Sheets:
- Click File → Download → Comma Separated Values (.csv)
- File downloads to your computer
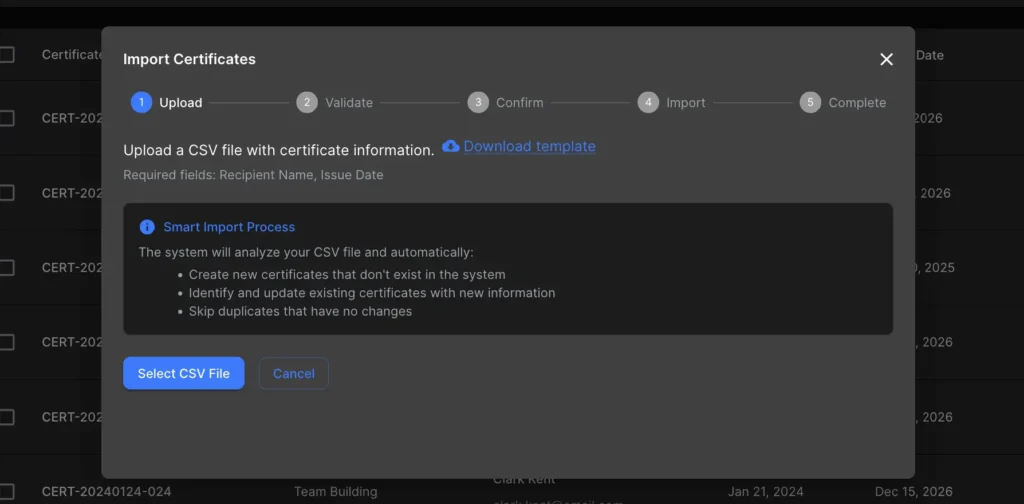
Step 5: Upload to CertLister
1. Go to Certificates Page
- Click Certificates in the top navigation
2. Click “Import Certificates”
- Look for “Import” or “+ Import Certificates” button (top right)
3. Upload Your CSV File
- Click “Choose File” or “Upload CSV”
- Select your CSV file
- Click “Open”
Step 6: Review and Validate
CertLister will check your file for:
- ✅ Correct column names
- ✅ Required fields present
- ✅ Date format valid
- ✅ No duplicates
- ⚠️ Category names (warnings if new)
You’ll see a summary:
- X certificates ready to import
- Y errors found (if any)
- Z warnings (if any)
Step 7: Fix Errors (if any)
Common errors:
Error: “Missing required field: recipient_name”
- Problem: Some rows have blank names
- Solution: Fill in all names or remove blank rows
Error: “Invalid date format in row 15”
- Problem: Date not in YYYY-MM-DD format
- Solution: Fix date format, re-save CSV, re-upload
Error: “Column ‘recipient_name’ not found”
- Problem: Column header misspelled
- Solution: Check exact spelling (no extra spaces, correct case)
To fix:
- Click “Cancel” or “Go Back”
- Open your CSV file
- Fix the errors
- Save again
- Re-upload
Step 8: Confirm Import
If validation passes:
- Review the summary one more time
- Check “Create X certificates” count
- Click “Import Certificates” or “Confirm Import”
Processing time:
- 10 certificates: ~5 seconds
- 100 certificates: ~30 seconds
- 500 certificates: ~2 minutes
Step 9: Verify Success
After import completes, you’ll see:
- ✅ Success message: “X certificates imported successfully”
- Summary: How many created, any skipped
- Option to view imported certificates
Next steps:
- Click “View Certificates” or go to Certificates page
- Filter by category to see your imported certificates
- Spot-check a few for accuracy
- Download a few PDFs to verify they look correct
Category Handling Dialog
What happens when your CSV includes categories that don’t exist in CertLister?
After uploading your CSV, if CertLister finds category names that don’t match existing categories, you’ll see a dialog with options:
Missing Categories Detected
The dialog shows:
- List of category names found in your CSV that don’t exist
- Number of certificates affected by each missing category
Example:
Missing categories found in your import:
- "Safety Training" (25 certificates)
- "First Aid" (12 certificates)
- "CPR Courses" (8 certificates)

Choose how to handle missing categories:
Option 1: Create New Categories (Recommended)
Choose this if:
- Category names are correct and intentional
- You want to organize certificates properly
- The categories make sense for your organization
What happens:
- CertLister automatically creates the missing categories
- Certificates are assigned to the new categories
- You can edit category details later
Example: You’re importing from a previous system and want to keep the same category structure.
Option 2: Assign to “Unassigned” Category
Choose this if:
- You’re not sure about category names yet
- You want to categorize certificates manually later
- You need to complete the import quickly
What happens:
- All certificates with missing categories are assigned to “Unassigned” category
- “Unassigned” category is created if it doesn’t exist
- You can recategorize certificates later from the Certificates page
Option 3: Skip Certificates with Missing Categories
Choose this if:
- Category names are incorrect (typos)
- You need to fix the CSV first
- You only want to import certificates with valid categories
What happens:
- Certificates with missing categories are not imported
- Other certificates with valid categories are imported
- You’ll see a summary of skipped certificates
Next step: Fix category names in your CSV and import again
How to Respond to the Dialog
- Review the list of missing categories
- Check for typos (e.g., “Safety Training” vs “Safety Trainings”)
- Choose an option:
- Click “Create Categories” (Option 1)
- Click “Assign to Unassigned” (Option 2)
- Click “Skip These Certificates” (Option 3)
- Proceed with import
Update Confirmation Dialog
What happens when your CSV contains certificate numbers that already exist but with different data?
CertLister detects duplicates by certificate number. If it finds existing certificates with different data, you’ll see a confirmation dialog:
Duplicate Certificates Detected
The dialog shows:
- List of certificate numbers that already exist
- Which fields have changed (highlighted)
- Number of certificates that will be updated
Example:
The following certificates already exist with different data:

Certificate: CERT-2024-123
- Existing: Sarah Johnson | CPR Certification | Expires: 2026-01-15
- New:      Sarah Johnson | CPR Certification | Expires: 2027-01-15
- Changes: Expiry date updated

Certificate: CERT-2024-456
- Existing: Michael Chen | First Aid | Active
- New:      Michael Chen | Advanced First Aid | Active
- Changes: Title updated

5 certificates will be updated. Continue?
Your Options
Option A: Update Existing Certificates (Recommended)
Choose this if:
- You want to update certificate data
- The new data is more accurate
- You’re correcting errors or extending expiration dates
What happens:
- Existing certificates are updated with new data
- PDF URLs and other metadata remain the same
- Update is logged in activity history
Click: “Update Certificates” button
Option B: Skip Duplicates
Choose this if:
- You don’t want to modify existing certificates
- You only want to import truly new certificates
- You’re not sure if updates are correct
What happens:
- Certificates with matching numbers are skipped
- Only new certificates (without certificate numbers) are imported
- Original data remains unchanged
Click: “Skip Duplicates” button
Option C: Cancel Import
Choose this if:
- You need to review the CSV first
- There are too many unexpected duplicates
- You want to investigate before proceeding
What happens:
- Import is canceled
- No changes are made
- You can fix your CSV and try again
Click: “Cancel” button
Best Practice
Before importing updates:
- Export existing certificates as CSV
- Compare with your import file
- Verify changes are intentional
- Proceed with update
Batch Processing
CertLister processes imports in batches for reliability and performance.
How It Works
Batch size: 50 certificates per batch
Example: If you import 250 certificates:
- Batch 1: Certificates 1-50 (20 seconds)
- Batch 2: Certificates 51-100 (20 seconds)
- Batch 3: Certificates 101-150 (20 seconds)
- Batch 4: Certificates 151-200 (20 seconds)
- Batch 5: Certificates 201-250 (20 seconds)
- Total time: ~2 minutes
You’ll see:
- Progress bar showing batch progress
- “Processing batch 2 of 5…” status message
- Percentage complete
Why Batches?
Benefits:
- Reliability: If one batch fails, others still succeed
- Progress tracking: See real-time progress
- Error isolation: Easier to identify which certificates had issues
- Performance: Prevents server timeouts on large imports
Recommended batch sizes:
- Small: 10-50 certificates (test imports)
- Medium: 50-200 certificates (normal use)
- Large: 200-500 certificates (bulk migration)
- Very large: 500+ (split into multiple CSV files)
Advanced Tips
Tip 1: Import in Batches
Don’t import all at once if you have 500+ certificates
Instead:
- Batch 1: 100 certificates (test)
- Review for accuracy
- Batch 2: 200 certificates
- Batch 3: Remaining certificates
Why: Easier to fix errors, less risk if something goes wrong
Tip 2: Use Templates
Save time with a template CSV:
- Do your first import
- Save the CSV file as a template
- For future imports:
- Copy the template
- Replace data, keep headers
- Import
Template file: certificate_import_template.csv
Tip 3: Calculate Expiration Dates
Excel formula for automatic expiration dates:
For 2-year certifications (CPR example):
=DATE(YEAR(D2)+2, MONTH(D2), DAY(D2))Where D2 is the issue_date cell.
Example:
- Issue date (D2): 2025-01-15
- Formula result: 2027-01-15
Apply to entire column:
- Enter formula in first cell
- Drag down to copy
Tip 4: Remove Duplicates Before Importing
In Excel:
- Select your data
- Go to Data → Remove Duplicates
- Choose columns to check (e.g., recipient_name + certificate_title)
- Click OK
In Google Sheets:
- Select your data
- Go to Data → Data cleanup → Remove duplicates
- Choose columns
- Click Remove duplicates
Tip 5: Use Conditional Formatting
Color-code your data for easier review:
In Excel:
- Select date columns
- Go to Home → Conditional Formatting
- Create rule: “Dates before today” = Red (already expired)
- Create rule: “Dates in next 30 days” = Yellow (expiring soon)
Helps you catch data entry errors before importing.
Troubleshooting
Import button is grayed out
Problem: Can’t click the Import button.
Reasons:
- Plan limit reached – Free tier allows 50 total certificates
- Permission issue – User role may not allow imports
- System maintenance – Rare, check CertLister status
Solutions:
- Check your plan limits (Settings → Billing)
- Upgrade to Pro for unlimited certificates
- Verify your user role (Admin or Manager needed)
“Certificate limit exceeded”
Problem: Import would exceed your plan limit.
Example: Free tier with 45 existing certificates, trying to import 20 more (total: 65 > 50 limit)
Solutions:
- Delete old/test certificates to free up space
- Import fewer certificates (in batches)
- Upgrade to Pro (unlimited)
“Duplicate certificate found”
Problem: Certificate already exists in your database.
Detection: CertLister checks for duplicates based on:
- Recipient name + certificate title + issue date
What happens:
- Duplicate rows are skipped (not imported)
- You’ll see which ones were skipped
Solutions:
- Remove duplicates from your CSV
- Check if certificates were already imported
- Adjust data to make unique (e.g., different issue dates if legitimately separate)
Some rows skipped
Problem: Import summary shows “X skipped.”
Common reasons:
- Duplicate certificates
- Missing required fields
- Invalid dates
- Category name issues
How to see which:
- Download the “skipped rows report” (button appears after import)
- CSV file shows which rows failed and why
- Fix errors and re-import just those rows
Dates imported incorrectly
Problem: Dates show wrong (e.g., 2025-01-15 became 1/15/2025).
This is display only – Data is stored correctly.
To fix display:
- This is how your browser/system shows dates
- The actual data is correct in database
- PDFs will show correctly formatted dates
Categories not matching
Problem: Some certificates imported but not in the category you expected.
Reasons:
- Typo in Category column
- Extra spaces (” Safety Training ” vs “Safety Training”)
- Wrong capitalization
Solution:
- Go to Certificates page
- Filter by category “Uncategorized” or the wrong category
- Bulk edit to move to correct category
- Or delete and re-import with correct category names
CSV file won’t open in CertLister
Problem: Upload fails or shows error.
Solutions:
- Check file size – Very large files (10,000+ rows) may timeout
- Split into smaller files
- Import in batches of 500-1000
- Check encoding – Save as UTF-8
- Excel: Save As → More Options → UTF-8
- Google Sheets: Already UTF-8
- Check for special characters – Remove emojis, unusual symbols
- Replace curly quotes with straight quotes
- Remove em-dashes
- Try a different browser – Chrome/Firefox work best
Import Limits
File Size Limits
- Maximum file size: 10 MB
- Maximum rows: 5,000 certificates per import
- For larger imports: Split into multiple files
Import Frequency
- No daily limits – Import as often as needed
- Recommended: Wait 30 seconds between large imports to avoid system load
Plan Limits
Free Tier:
- Total certificates: 50 (including imports)
- Imports allowed: Yes
- Max per import: 50 (total limit)
Pro Tier:
- Total certificates: Unlimited
- Imports allowed: Yes
- Max per import: 5,000 per file
Enterprise Tier:
- Total certificates: Unlimited
- Imports allowed: Yes
- Max per import: Custom (contact support for 10,000+)
After Importing
Step 1: Quality Check
Spot-check 5-10 random certificates:
- Open certificate details
- Verify name, title, dates are correct
- Download PDF and review
If errors found:
- Edit individual certificates
- Or delete the batch and re-import with corrections
Step 2: Generate PDFs (if needed)
Bulk import creates database records but may not immediately generate PDFs.
To generate PDFs:
- PDFs are created on-demand when you first view/download
- Or use “Generate All PDFs” button (if available in your account)
Step 3: Organize with Categories
After import:
- Review category distribution (Dashboard or Categories page)
- Merge categories if you created duplicates
- Rename categories for consistency
Step 4: Set Up Expiration Tracking
If you imported expiration dates:
- Go to Dashboard
- Check “Upcoming Expirations” section
- Set up notifications (if available)
Learn more: Expiration Tracking →
Examples
Example 1: After Group CPR Training
Scenario: 30 employees completed CPR training on January 15, 2025. Certificates expire in 2 years.
CSV:
recipient_name,certificate_title,category_name,issue_date,expiration_date,description
John Smith,CPR Certification,Safety Training,2025-01-15,2027-01-15,
Sarah Johnson,CPR Certification,Safety Training,2025-01-15,2027-01-15,
Michael Chen,CPR Certification,Safety Training,2025-01-15,2027-01-15,
...
Result: 30 certificates created in ~10 seconds.
Example 2: Migrating Historical Data
Scenario: Moving 500 certificates from old Excel spreadsheet to CertLister.
Steps:
- Clean up Excel data (remove blank rows, fix dates)
- Add column headers to match CertLister format
- Save as CSV
- Test import with first 50 certificates
- Review for accuracy
- Import remaining 450 in batches of 100
Time: 1-2 hours (vs. 40+ hours creating manually)
Example 3: Annual Renewals
Scenario: 100 people renewing Food Safety certification annually.
Process:
- Export last year’s certificates
- Update issue dates (new year)
- Update expiration dates (new year + 1)
- Import as new certificates
Or:
- Use bulk update instead of import (if certificates already exist)
Best Practices
✅ DO
- Test first – Import 5-10 certificates as a test batch
- Use templates – Save a working CSV as a template
- Validate dates – Double-check date format
- Back up – Keep original CSV files
- Document – Note what each import was for
❌ DON’T
- Rush – Take time to prepare data correctly
- Skip validation – Always review before confirming
- Import duplicates – Check for existing certificates first
- Use complex formatting – Keep CSV simple (no formulas, colors, etc.)
- Assume – Verify categories, dates, and names
Data Cleanup Checklist
Before importing, review your data:
- [ ] All required columns present and spelled correctly
- [ ] No blank rows (delete empty rows at bottom)
- [ ] Dates in YYYY-MM-DD format
- [ ] Names capitalized consistently
- [ ] Certificate titles standardized
- [ ] Categories match existing ones (or intentional new ones)
- [ ] No extra spaces before/after text
- [ ] No special characters or emojis
- [ ] File saved as CSV (not .xlsx)
- [ ] File under 10 MB


