Custom Certificate Attributes
Time to read: 8 minutes
Overview
Custom certificate attributes let you attach domain-specific data fields to certificates at the category level. Define fields like "Score", "Instructor", "Training Hours", or "Permit Number" — then fill them in for each certificate recipient. Values appear in generated PDFs and on the public verify page.
Example use cases:
- A Python training provider adds "Score" and "Instructor" fields to their "Python Training" category
- A food safety certifier adds "Permit Number" and "Issuing Authority" to their compliance category
- A fitness organization adds "Hours Completed" and "Trainer Name" to each certification
Requires: Pro plan
How the Feature Works
Custom attributes follow a four-step flow:
- Define fields on a category (Admin, Pro plan)
- Enter values when creating or editing individual certificates
- Place tokens in your certificate design to print the values in PDFs
- Verify page shows the values publicly when someone looks up a certificate
Part 1: Define Custom Fields on a Category
Requires: Admin role and Pro plan
Step 1: Go to Categories
- Log into CertLister at https://app.certlister.com
- Click Categories in the left navigation
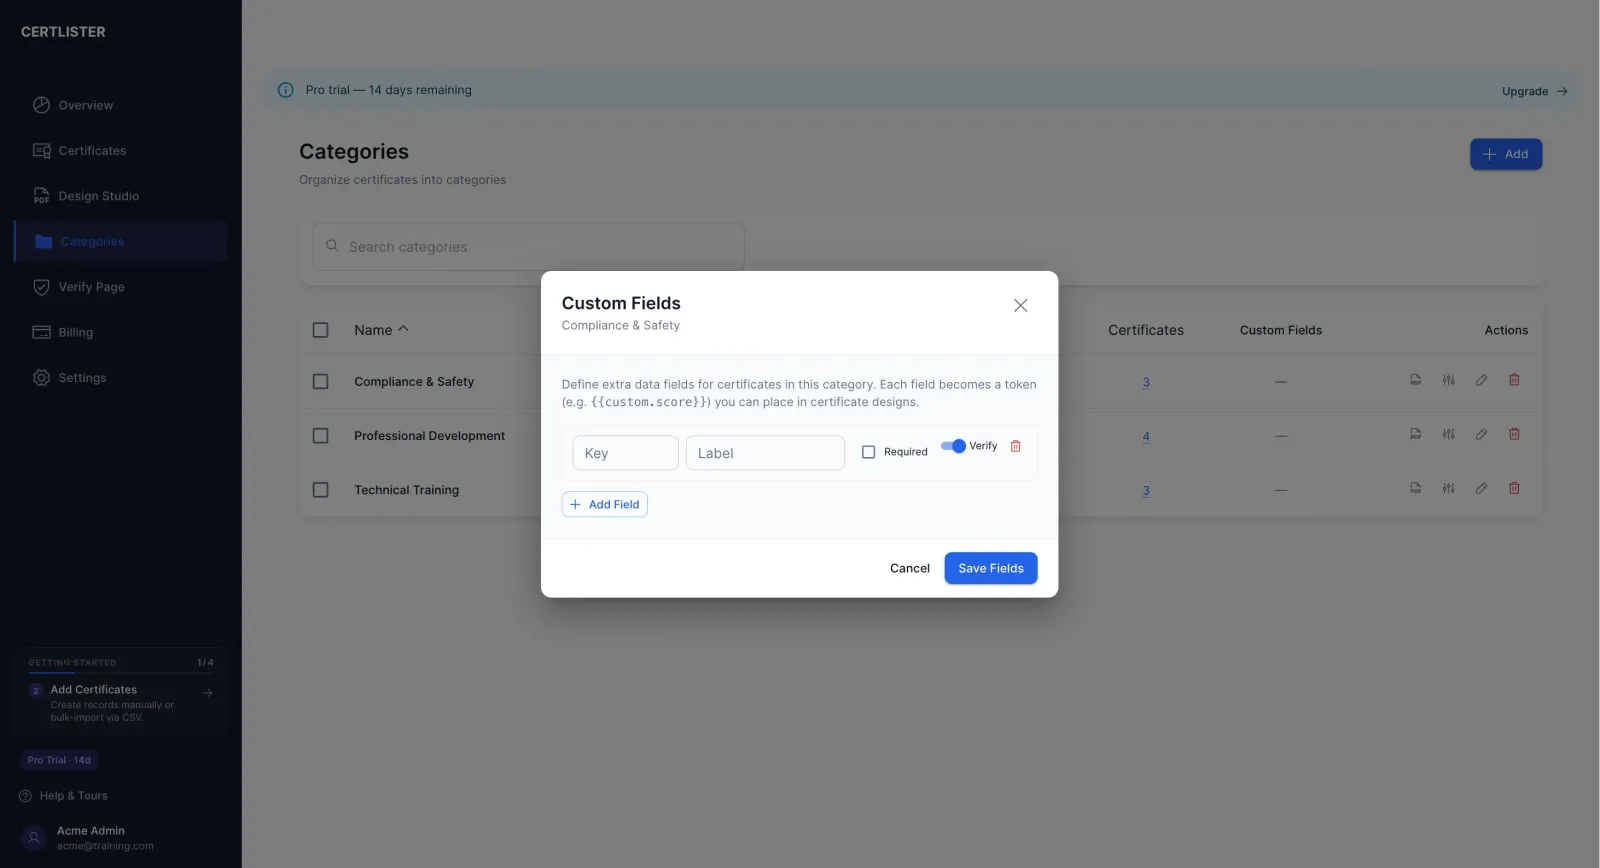
Step 2: Open the Custom Fields Dialog
- Find the category you want to add fields to
- Click the Sliders icon in that category's row — this opens the Custom Fields dialog
- If your organization is on the Free or Basic plan, you will see a lock icon and an Upgrade button instead of the field editor
Step 3: Add Fields
- Click Add Field
- Fill in the three properties for each field:
| Property | Description | Rules |
|---|---|---|
| Key | Internal identifier used in design tokens | Lowercase letters, numbers, and underscores only. Max 30 characters. Example: score |
| Label | Display name shown to users and on the verify page | Max 50 characters. Example: Score |
| Required | Whether this field must be filled in when creating a certificate | Check or uncheck |
- Add as many fields as you need — there is no limit
- Click Save Fields when done
Example setup for a "Python Training" category:
| Key | Label | Required |
|---|---|---|
score | Score | No |
instructor | Instructor | Yes |
hours | Training Hours | No |
Important: Renaming or Removing Field Keys
A warning appears in the dialog if you rename or remove a key that already has stored values on existing certificates. Changing the key does not delete the stored data — but the values will not display until the original key is restored. Rename keys carefully and only before certificates have been created in that category.
Part 2: Enter Values When Creating a Certificate
Once a category has custom fields, those fields appear automatically in the Create Certificate and Edit Certificate dialogs when that category is selected.
Creating a Certificate with Custom Fields
- Go to Certificates → click Add Certificate (or Import for bulk)
- Fill in the standard fields (recipient name, title, dates)
- Select a category that has custom fields defined
- The custom fields appear below the standard section — fill them in
- Required fields are marked with an asterisk (*) and must be completed before saving
- Click Save
Editing Existing Certificates
- Open a certificate that belongs to a category with custom fields
- Click Edit
- The custom fields appear with any previously saved values
- Update values as needed and save
Note: Adding custom fields to a category does not retroactively fill in values for existing certificates. You can edit each certificate individually to add the values, or re-import with a CSV that includes the extra columns (see Part 5 below).
Part 3: Use Tokens in Certificate Designs
Custom attribute tokens follow the format {{custom.fieldkey}}. Place them in the Design Studio to print custom values in generated PDFs.
Step 1: Open the Design Studio
- Click Generate in the left navigation
- Open the design you want to update — or create a new one
Step 2: Find Custom Field Tokens in the Attributes Panel
- Click the Attributes icon in the left toolbar
- Scroll down to the Custom Fields section in the Selection Panel
- Your custom field tokens appear as clickable buttons — one per unique field key, across all of your organization's categories
- If two categories have a field with the same key but different labels (e.g., "Score" in one and "Test Score" in another), both labels are shown merged on the button
Step 3: Add a Token to the Canvas
- Click a token button to add it to the canvas at a default position
- Drag the token button directly onto the canvas to place it exactly where you want it
- Style the token element like any other text element: font, size, colour, alignment
Step 4: Save the Design
Click Save in the top right. The design is now ready to generate PDFs with custom values.
At generation time:
{{custom.score}}→ replaced with the actual score for each recipient (e.g., "92%"){{custom.instructor}}→ replaced with the instructor's name (e.g., "Dr. Smith")- If a certificate has no value for a token, the token is replaced with an empty string (blank space)
Part 4: Custom Attributes on the Public Verify Page
When someone looks up a certificate on your public verify page, an Additional Details section appears below the standard certificate information — but only if the certificate has custom attribute values and your organization is on the Pro plan.
Example of what visitors see:
Additional Details

Score            92%
Instructor       Dr. Smith
Training Hours   16 hours
Only fields that have a saved value are shown. Fields without a value are omitted. Email addresses, internal notes, and other private data are never exposed on the verify page.
Part 5: Import Custom Attributes via CSV
When you import certificates via CSV, any column that is not a standard CertLister field is automatically treated as a custom attribute. No extra configuration is needed.
How It Works
Standard fields that the importer recognizes: Certificate Number, Title, Recipient Name, Recipient Email, Issue Date, Expiry Date, Status, Category
Any column name outside this list is mapped to {{custom.columnname}}. For example, a column named score becomes {{custom.score}} in generated PDFs.
Example CSV
Certificate Number,Title,Recipient Name,Recipient Email,Issue Date,Expiry Date,Status,Category,score,instructor
,Python Training,Sarah Johnson,sarah@email.com,2026-01-15,2027-01-15,active,Python Training,92%,Dr. Smith
,Python Training,Michael Chen,mchen@company.com,2026-01-15,2027-01-15,active,Python Training,87%,Dr. Smith
The columns score and instructor are saved as custom attribute values and will render in PDFs via {{custom.score}} and {{custom.instructor}} tokens.
Notes:
- Column names in the CSV are used as-is as the attribute key. Keep them lowercase and without spaces to match your category field keys.
- The importer does not validate CSV custom columns against the category's defined schema. Values are stored regardless.
- The category schema (defined in the Custom Fields dialog) controls display names, required validation, and token resolution — not the import.
Learn more: Bulk Import Certificates from CSV
Troubleshooting
The Custom Fields dialog shows a lock icon
Cause: Your organization is on the Free or Basic plan. Custom attributes require Pro.
Solution: Upgrade at https://app.certlister.com/billing
Custom fields do not appear in the certificate dialog
Check:
- You selected a category that has at least one field defined — open the Categories page, find the category, click the Sliders icon, and confirm fields are listed
- Your organization is on the Pro plan
- You are selecting the category before looking for the fields (fields load when the category is selected)
A token in the PDF shows as {{custom.score}} instead of a real value
Causes and fixes:
| Cause | Fix |
|---|---|
| The certificate has no value saved for that field | Edit the certificate and enter the value |
| The token key does not match the field key | Keys are case-sensitive and must be exact. {{custom.Score}} is not the same as {{custom.score}} |
| The certificate was created before the field was added | Edit the certificate to add the value |
The verify page does not show custom attributes for a certificate
Check:
- Your organization is on the Pro plan (the API does not return custom attributes for non-Pro orgs)
- The certificate has at least one custom attribute value saved (edit the certificate to confirm)
- The attribute key in the verify response matches the category schema
The design preview shows [score] instead of a real value
This is expected. The Design Studio canvas preview has no real certificate data. Custom tokens display as [fieldkey] in the preview to show that the token is recognized. The actual value is substituted at PDF generation time.
Frequently Asked Questions
Q: How many custom fields can I add per category?
A: There is no limit.
Q: Can different categories have different custom fields?
A: Yes — each category has its own independent field schema. "Python Training" can have Score and Instructor; "Food Safety" can have Permit Number and Expiry Region. These are completely separate.
Q: What happens to existing certificates when I add new fields to a category?
A: Existing certificates are not affected. New fields appear blank for existing certificates. Required validation applies only when creating new certificates — editing an existing certificate will show the new field but not force you to fill it in.
Q: Can I use the same token key in multiple categories?
A: Yes. The Design Studio merges all unique keys across all category schemas into one list in the Attributes panel. A token like {{custom.score}} in your design will resolve to the score value of whichever category the specific certificate belongs to.
Q: Are custom attribute values searchable in the certificates list?
A: Not currently. Search works on recipient name, certificate number, and title.
Q: Can custom attribute values be exported to CSV?
A: Not currently. The standard CSV export includes the core fields only. Custom attribute export may be added in a future update.
Q: Do custom attributes work with the legacy SVG certificate generator?
A: Yes. The legacy SVG generator also resolves {{custom.key}} tokens when they appear in an SVG template.
Q: What happens to custom attribute data if I downgrade from Pro to Basic?
A: The stored values remain in the database. However, the verify page will stop showing the Additional Details section, and the Custom Fields dialog will show a lock icon. Values are restored immediately if you upgrade back to Pro.