Certificate Verification: Verify Page & Embedding
Time to read: 8 minutes
Overview
Every CertLister organization gets a public Verify Page — a branded web page where anyone can confirm a certificate is genuine. You can share this page directly or embed it on your own website.
| Option | What it is | Plans |
|---|---|---|
| Verify Page | Public URL anyone can visit | All plans |
| iFrame embed | Embed the widget on your own site | All plans |
| iFrame theme options | Light, dark, transparent, custom accent color | All plans |
| Advanced CSS customization | Drive widget colors from your own stylesheet | All plans |
| Branding (logo, color, custom URL) | Customize how your verify page looks | Basic & Pro |
Part 1: Your Verify Page
What It Is
A public web page where employers, auditors, and certificate holders can verify authenticity — no CertLister account required.
Default URL format:
https://app.certlister.com/verify/{your-organization-id}
Your organization ID is a unique identifier (e.g., a1b2c3d4-e5f6-7890-abcd-ef1234567890). You can find it in the app under Verify Page.
Friendly URL (Basic & Pro plans):
https://app.certlister.com/verify/acme-corp
See Setting a Custom URL Slug below.
How to Find Your Verify Page URL
- Log into CertLister
- Click Verify in the left navigation
- Your URL is shown at the top of the page
- Click the copy icon to copy it, or the open icon to preview it in a new tab
What Visitors Can Do
Search for a certificate:
- Enter a recipient name (e.g., "Sarah Johnson")
- Or enter a certificate number (e.g., "CERT-2025-001")
Result states:
- Active — Certificate is genuine and currently valid
- Expired — Certificate was valid but has since expired
- Revoked — Certificate has been revoked and is no longer valid
- Not found — No matching certificate exists
Share to LinkedIn: When a recipient finds their active certificate, they see an Add to LinkedIn Profile button. One click pre-fills the LinkedIn certification form with their name, issue date, and a direct link back to the verification page.
How to Share Your Verify Page
On printed certificates or PDFs:
Verify this certificate at:
https://app.certlister.com/verify/acme-corp

Certificate number: CERT-2025-001
In email signatures:
Verify our certificates:
https://app.certlister.com/verify/acme-corp
As a link on your website:
<a href="https://app.certlister.com/verify/acme-corp">
  Verify Certificates
</a>
As a QR code:
- Generate a QR code for your verify URL (free tools: qr-code-generator.com, qrcode.com)
- Include the QR code image on certificate PDFs
- Recipients scan with their phone to verify instantly
Part 2: Branding Your Verify Page (Basic & Pro)
On the Basic and Pro plans, you can customize how your verify page looks to match your organization's brand.
Organization Logo
Upload your logo and it will appear in the header of your verify page.
To upload:
- Go to Settings → Organization
- Click Upload Logo
- Use a transparent PNG in wide format (e.g., 300×80 px) — max 2 MB
Brand Color
Set a primary color that applies to the hero section background on your verify page.
To set:
- Go to Settings → Organization
- Use the color picker or enter a hex code (e.g.,
#2563eb) in the Brand Color field - Click Save color
Setting a Custom URL Slug
Replace the UUID in your verify URL with a human-readable name.
Before: https://app.certlister.com/verify/a1b2c3d4-e5f6-7890-abcd-ef1234567890 After: https://app.certlister.com/verify/acme-corp
To set:
- Go to Settings → Organization
- Find the Verify Page URL field
- Enter your slug (e.g.,
acme-corp) - Click Save URL
Slug rules:
- 3–30 characters
- Lowercase letters, numbers, and hyphens only
- No leading or trailing hyphens
- Must be unique across CertLister
The old UUID URL continues to work after setting a slug — nothing breaks for recipients who have bookmarked it.
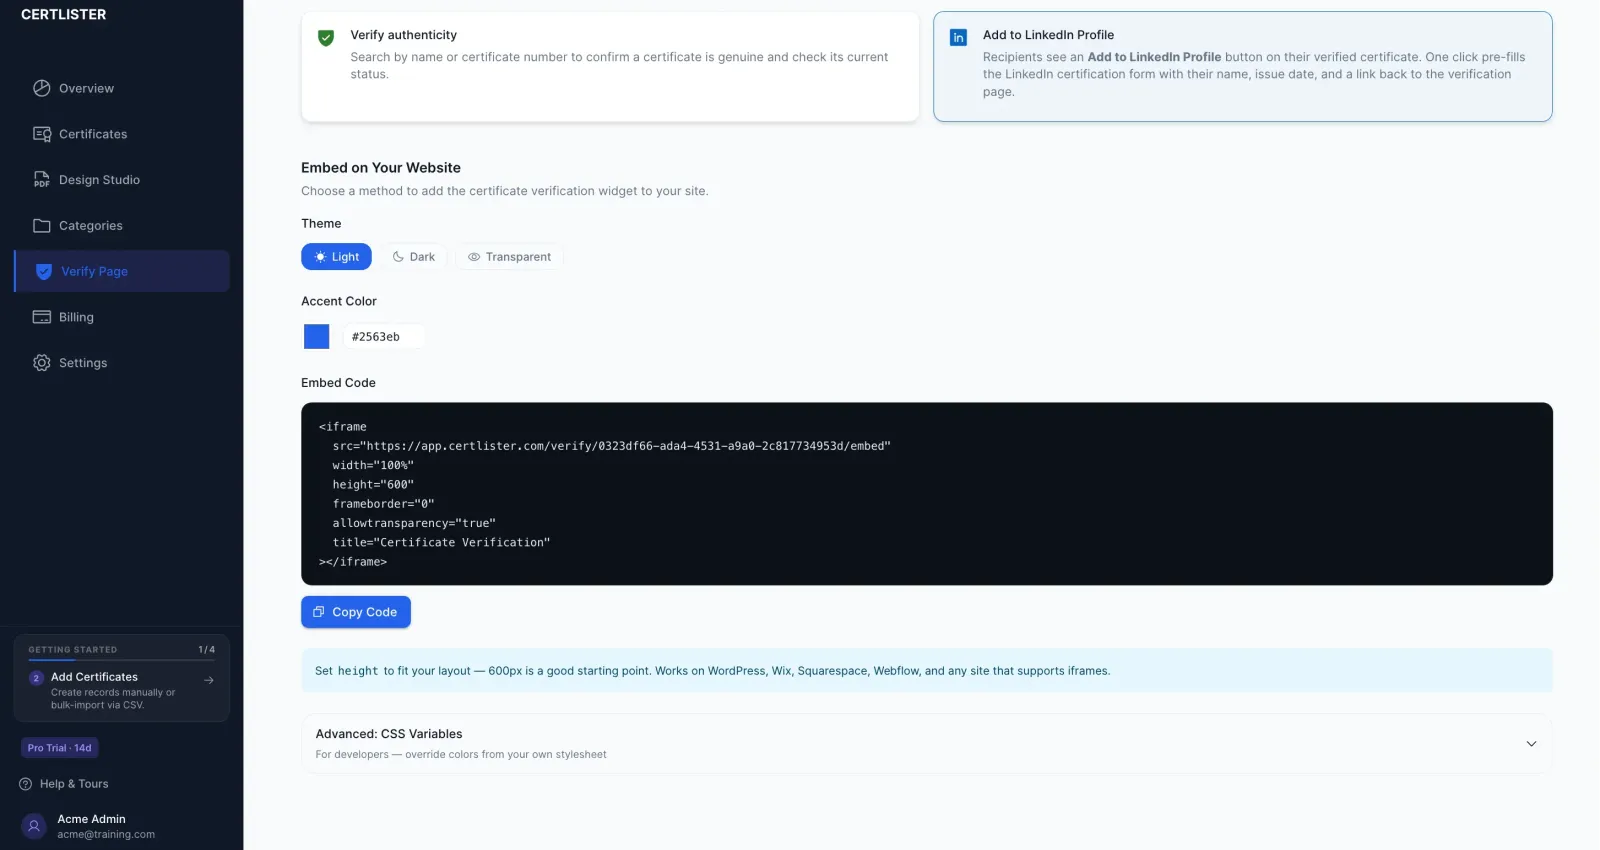
Part 3: Embedding on Your Website
Embed the verification widget directly on your own website so visitors never have to leave your site to verify a certificate.
Getting the Embed Code
- Go to Verify in the left navigation
- Scroll to Embed on Your Website
- Choose your theme and accent color
- Click Copy Code
- Paste the snippet into your site
Styling Options
Before copying the code, customize how the widget looks using the controls in the embed section.
Theme
| Theme | Best for |
|---|---|
| Light (default) | Sites with a white or light background |
| Dark | Sites with a dark or black background |
| Transparent | Sites where you want the widget to blend into the page background |
When you select Transparent, the widget has no background of its own — it inherits whatever color is behind the iframe on your page.
Accent Color
Click the color swatch or type a hex code to set the color used for buttons and interactive elements. This is useful when you want the verify button to match your site's primary brand color.
A Reset button appears when you change from the default to restore it.
The embed code updates automatically as you make selections. The src URL encodes your choices:
/verify/{orgId}/embed                         → light theme, default color
/verify/{orgId}/embed?theme=dark              → dark theme
/verify/{orgId}/embed?theme=transparent       → transparent
/verify/{orgId}/embed?color=e63946            → custom accent color
/verify/{orgId}/embed?theme=dark&color=e63946 → dark + custom accent
The Embed Snippet
<iframe
  src="https://app.certlister.com/verify/YOUR-ORG-ID/embed"
  width="100%"
  height="600"
  frameborder="0"
  allowtransparency="true"
  title="Certificate Verification"
></iframe>
Tips:
- Use
width="100%"to make it responsive - Adjust
heightto fit your layout — 600px is a good starting point - No JavaScript required
Platform Instructions
WordPress
- Edit the page where you want the widget
- Add a Custom HTML block
- Paste the iFrame snippet
- Publish
Wix
- In the Wix editor, add an HTML iFrame element
- Click Enter Code
- Paste the iFrame snippet
- Adjust the element size on the canvas
- Publish
Squarespace
- Edit the page
- Add a Code Block
- Paste the iFrame snippet
- Save and publish
Webflow
- Add an Embed element to your page
- Paste the iFrame snippet
- Publish site
Part 4: Advanced — CSS Variables (For Developers)
If you manage your site's colors through a CSS stylesheet or design system, you can drive the widget's colors directly from your own CSS variables. This keeps your brand colors in one place rather than hardcoding them into a URL.
Note: This method requires adding a small JavaScript snippet to your page. If your platform doesn't allow custom JavaScript (Wix, Squarespace), use the standard iFrame embed from Part 3 instead.
How It Works
- You define CSS variables in your stylesheet with the widget's expected names
- A small bridge script reads those values and forwards them into the widget
- The widget applies them at load time
Your existing CSS stays exactly where it is — you're just telling the widget to read from it.
Getting the Advanced Code
- Go to Verify → Embed on Your Website
- Click Advanced: CSS Variables at the bottom of the embed section
- Click Copy All
- Paste the entire block into your HTML
The block contains three parts: a <style> tag, the <iframe> tag, and a bridge <script>. All three are required.
The CSS Variables
Edit the values in the <style> block to match your brand:
<style>
  :root {
    --cl-primary : #2563eb;  /* Buttons & accent color  */
    --cl-bg      : #ffffff;  /* Widget background       */
    --cl-card    : #f9fafb;  /* Card & form background  */
    --cl-text    : #121828;  /* Primary text color      */
    --cl-radius  : 8px;      /* Corner radius           */
  }
</style>
| Variable | Controls | Example values |
|---|---|---|
--cl-primary | Verify button, links, accents | #e63946, #6d28d9 |
--cl-bg | Widget / page background | #ffffff, #0f172a |
--cl-card | Search form and result card backgrounds | #f9fafb, #1e293b |
--cl-text | Primary text color | #121828, #f8fafc |
--cl-radius | Corner radius on all elements | 0px, 4px, 16px |
If you already have these colors defined elsewhere in your CSS under different names, you can reference them:
:root {
  --cl-primary : var(--brand-blue);
  --cl-bg      : var(--surface-default);
  --cl-text    : var(--text-primary);
  --cl-radius  : var(--radius-md);
}
Full Example
<!-- 1. Set your brand colors — edit the values below -->
<style>
  :root {
    --cl-primary : #e63946;
    --cl-bg      : #f8f9fa;
    --cl-card    : #ffffff;
    --cl-text    : #212529;
    --cl-radius  : 12px;
  }
</style>

<!-- 2. The widget -->
<iframe
  id="cl-verify"
  src="https://app.certlister.com/verify/YOUR-ORG-ID/embed"
  width="100%"
  height="600"
  frameborder="0"
  allowtransparency="true"
  title="Certificate Verification"
></iframe>

<!-- 3. Bridge — reads your CSS variables and sends them to the widget -->
<script>
(function () {
  var f = document.getElementById('cl-verify');
  var s = getComputedStyle(document.documentElement);
  function send() {
    f.contentWindow.postMessage({
      type    : 'cl-theme',
      primary : s.getPropertyValue('--cl-primary').trim(),
      bg      : s.getPropertyValue('--cl-bg').trim(),
      card    : s.getPropertyValue('--cl-card').trim(),
      text    : s.getPropertyValue('--cl-text').trim(),
      radius  : s.getPropertyValue('--cl-radius').trim()
    }, 'https://app.certlister.com');
  }
  f.addEventListener('load', send);
  if (f.contentDocument && f.contentDocument.readyState === 'complete') send();
})();
</script>
Important: The
id="cl-verify"on the iframe and thegetElementById('cl-verify')in the script must match. If you have multiple widgets on the same page, give each a unique ID and add a separate bridge script for each.
Part 5: Comparison
| Verify Page (link) | iFrame embed | iFrame + CSS variables | |
|---|---|---|---|
| Setup time | None | ~5 minutes | ~15 minutes |
| Requires coding | No | No | Basic HTML/CSS |
| Stays on your site | No | Yes | Yes |
| Theme options | Org branding | Light / Dark / Transparent + accent color | Full color control |
| Works on Wix / Squarespace | N/A | Yes | Requires JS support |
| Syncs with your design system | No | No | Yes (via CSS variables) |
| Best for | Emails, PDFs, sharing | Most websites | Developer-built sites |
Troubleshooting
iFrame Shows a Blank Page
- Verify the
srcURL ends with/embed(e.g.,.../verify/YOUR-ORG-ID/embed) - Make sure the organization ID is correct — copy it directly from the Verify page in the app
- Check that your site's Content Security Policy (CSP) allows iFrames from
app.certlister.com - Try opening the
srcURL directly in your browser to confirm it loads
iFrame Styling Isn't Applying
- Double-check the URL params in the
src— colors are passed without the#symbol (e.g.,?color=e63946, not?color=#e63946) - If using the CSS variables method, confirm the bridge
<script>is present on the same page as the<iframe>and that theidvalues match - CSS from your page's stylesheet has no effect on the inside of an iFrame — you must use the URL params or the CSS variables bridge
CSS Variables Method Not Working
- Make sure all three parts are present: the
<style>block, the<iframe>, and the<script> - The CSS variables bridge requires JavaScript to be enabled — it will not work on platforms that block custom scripts (Wix, Squarespace). Use the standard iFrame embed instead
- Open your browser console (F12 → Console) and check for errors
- Confirm your CSS variable names exactly match the names the bridge is reading (e.g.,
--cl-primary, not--cl-primary-color)
iFrame Doesn't Resize on Mobile
- Set
width="100%"on the iframe element - Do not set a fixed pixel width
- Adjust the
heightvalue if content is clipped — 700px may be needed on mobile if results are showing
Widget Shows Wrong Colors After Update
- The widget reads CSS variables once at load time. If you update a variable dynamically after page load, the widget won't automatically re-read it
- To force a refresh, reload the page
Frequently Asked Questions
Q: Can I use a custom domain (e.g., verify.acme.com)?
A: Not currently — verification pages are served from app.certlister.com. Custom domains may be considered for a future plan tier.
Q: What if I change my slug — do old URLs break?
A: No. The UUID URL always works. When you set or change a slug, the old slug stops working but the UUID URL continues to function. Let recipients know if you change a published slug.
Q: Can I set both a theme and CSS variables at the same time?
A: Yes — they work together. The URL theme param (?theme=dark) sets the base mode (light or dark), and CSS variables override individual colors on top of that. If you set --cl-bg via CSS variables while also using ?theme=transparent, the explicit CSS color takes priority.
Q: Can I embed multiple verify widgets on one page?
A: Yes. Give each iframe a different id and add a separate bridge script for each one pointing to that id.
Q: Does the widget update automatically when certificates change?
A: Yes. The widget shows real-time data — a revoked certificate appears as revoked immediately on the next search, and newly issued certificates are available right away.
Q: Can I see who is verifying certificates?
A: Verification logging is available on Basic and Pro plans. Go to your dashboard to see verification activity.
Q: What information is publicly visible on the verify page?
A: Only: recipient name, certificate title, issue date, expiry date (if set), status, and any custom fields you have configured. Email addresses, internal notes, and organization contact details are never exposed.
Q: Is there a limit on how many verifications can happen?
A: No — all plans support unlimited verification requests.