
Bulk Import Credentials from CSV
Overview
Import hundreds of credentials at once using a CSV file. Much faster than creating credentials one at a time. Import is one of the credential management features.
Time savings: Import 100 credentials in 5 minutes (vs. 5+ hours manually)
Skill level: Basic (Excel/Google Sheets knowledge required)
When to Use Bulk Import
Ideal Scenarios
- Migrating from another system - Have existing credential data
- After group training - 20+ students completed the same course
- Historical credentials - Adding past credentials to your system
- Recurring certifications - Annual renewals for many people
- Large events - Conferences, workshops with many participants
When NOT to Use Bulk Import
- Single credentials - Faster to create manually
- Under 10 credentials - Not worth setting up CSV
- First time user - Create a few manually first to understand the process
Before You Start
Requirements
You'll need:
- Credential data in Excel, Google Sheets, or CSV format
- Basic spreadsheet skills
- 30-60 minutes to prepare your data
Available on: every plan, for the Admin and Manager roles. Each new credential uses 1 credit; updating an existing credential is free. Pro has unlimited credentials. See Plans & Billing.
Data Quality Check
Before importing, verify:
- All names are spelled correctly
- Dates are in correct format
- Category names match your existing categories
- No duplicate entries
- No blank required fields
Tip: Start with a small test batch (5-10 credentials) before importing hundreds.
CSV File Format
The Columns
CertLister recognises these columns. Order does not matter — after you upload, a Map Columns step shows what it matched, and you can change any of it.
| # | Column Name | Description | Required? | Example |
|---|---|---|---|---|
| 1 | Credential Number | Unique ID (leave blank for new credentials) | Optional | CERT-2025-001 |
| 2 | Title | What they completed | Required for new credentials, unless the category sets a default title | CPR Certification |
| 3 | Recipient Name | Full name of person | Required | Sarah Johnson |
| 4 | Recipient Email | Email address | Optional | sarah@email.com |
| 5 | Issue Date | When issued | Required for new credentials | 2025-01-15 |
| 6 | Expiry Date | When it expires | Optional | 2027-01-15 |
| 7 | Status | Credential status | Optional | active |
| 8 | Category | Credential category | Optional | Safety Training |
| 9 | custom.<key> | Value for a category-level custom field | Optional | 92 |
Only Recipient Name must be present in every file. Everything else depends on what you are doing — see Updating existing credentials below, which matters a great deal if your file is not creating brand-new records.
Column Details
1. Credential Number
- When to use: Updating existing credentials
- For new credentials: Leave blank and CertLister generates a number, or enter your own
- Format: Any text (e.g., CERT-2025-001)
- If the number already belongs to one of your credentials: the row updates that credential
2. Title (Required for New Credentials)
- What it is: The certification name or achievement
- Examples: "CPR Certification", "First Aid Training", "Food Safety Handler"
- Can be blank: When the row's category has a default title — the default is used
- Tips: Be specific and consistent with naming
3. Recipient Name (Required)
- Format: Full name (first and last)
- Examples: "Sarah Johnson", "Dr. Michael Chen", "Emily Rodriguez"
- Can be blank: No — every row needs one
- Tips: Check spelling carefully - this appears on the credential
4. Recipient Email (Optional)
- Format: Valid email address
- Examples: "sarah@email.com", "mchen@company.com"
- Used for: Sending the credential later, and matching rows to credentials you already have. Importing does not email recipients.
- Can be blank: Yes
5. Issue Date (Required for New Credentials)
- Format: See Step 2: Format Dates below.
2025-01-15(YYYY-MM-DD) always works - Examples: "2025-01-15", "15/01/2025", "January 15, 2025"
- Can be blank: Only when the row updates an existing credential — the stored date is kept
6. Expiry Date (Optional)
- Format: Same as the issue date
- Examples: "2027-01-15", "2026-06-30"
- Can be blank: Yes (credential never expires)
- Validation: Must be after issue date
7. Status (Optional)
- Valid values:
active- Credential is validexpired- Credential has expiredrevoked- Credential was revoked
- If blank: A new credential is
active; an existing credential keeps its status - Case-insensitive: "Active", "ACTIVE", "active" all work
supersededin an export: A credential that a renewal replaced shows as Replaced in the app and exports assuperseded. The import leaves that status as it is and applies the rest of the row. It can't set or clearsuperseded
8. Category (Optional)
- Format: The name of one of your categories. Capitalization and spaces before or after the name don't matter
- Examples: "Safety Training", "Compliance", "Professional Development"
- If no category has that name: See "Category Handling Dialog" below
- Can be blank: Yes (credential will be uncategorized)
9. Custom Fields (Optional)
- What it is: A value for a custom field on the row's category — score, instructor, license number, or whatever your categories define
- Column header:
custom.<key>(what CertLister's own export writes), or the field's key or label when it's the only field that name could mean - Can be blank: Yes. On an update, a blank cell in a mapped column clears the stored value
- Where it's mapped: These columns aren't in the table above — the Map columns step shows a second table, Custom fields, listing every field your categories define
- More: see Custom Credential Attributes
Example CSV File
Creating new credentials — every column filled in:
Credential Number,Title,Recipient Name,Recipient Email,Issue Date,Expiry Date,Status,Category
,CPR Certification,Sarah Johnson,sarah@email.com,2025-01-15,2027-01-15,active,Safety Training
,First Aid Training,Michael Chen,mchen@company.com,2025-01-15,2028-01-15,active,Safety Training
,Food Safety Handler,Emily Rodriguez,emily@school.edu,2025-01-10,2026-01-10,active,Compliance
,CPR Certification,Maria Garcia,,2025-01-15,2027-01-15,active,Safety Training
Notes on this example:
- Every row creates a new credential, because
Credential Numberis blank - Maria Garcia has no email — an empty cell is fine when creating
Updating Existing Credentials
To change credentials that already exist, include their Credential Number so CertLister knows which record each row refers to. Then one rule decides what happens to everything else:
| In your file | What happens |
|---|---|
| Column not in the file at all | That field is left exactly as it is |
| Column present, cell filled in | The field is set to that value |
| Column present, cell empty | The field is cleared |
So include only the columns you want to change. An empty cell is an instruction to erase, not an instruction to skip.
Exceptions: an empty Status or Issue Date cell leaves the stored value as it is, and an empty Title cell uses the default title of the row's category, if it has one. Recipient Name can't be empty.
Custom fields follow the same table, with one added rule: clearing a value that's required for its category is refused — the row is held back rather than losing the value. See Custom Credential Attributes for how custom columns are matched and what happens when a category doesn't define the field.
Example — extending expiry dates and nothing else:
Credential Number,Expiry Date
CERT-2024-789,2027-06-30
CERT-2024-812,2027-06-30
Titles, recipients, emails, issue dates and categories on those two credentials are untouched, because those columns are not in the file.
Example — the same file with a mistake in it:
Credential Number,Title,Recipient Email,Expiry Date
CERT-2024-789,,,2027-06-30
This sets the expiry date and wipes the title and email, because those two columns are present with empty cells. If you did not mean to clear them, delete the columns rather than leaving them blank.
The Validate step lists every field each row will change before anything is written, so check it — especially the Updates tab.
Rows without a credential number. CertLister still recognises a row that describes a credential you already have, using the same rule as issuing one by hand: the recipient's name and email, the category, the credential title and the issue date. A column that is not in your file is left out of that comparison, and so is a category name you have not created yet. A matching row can change only what is not part of the rule, such as the expiry date or the status. People who share one email address — for example, a manager who receives everyone's credentials — are told apart by their names. To change a title, email, recipient name, category or issue date, include the Credential Number column.
Step-by-Step Guide
Step 1: Prepare Your Data in Excel/Google Sheets
1. Open your spreadsheet program
- Excel, Google Sheets, or LibreOffice Calc
2. Create column headers using the names in the table above. To start from a ready-made file, click Download template in the import dialog.
Order doesn't matter, and CertLister recognizes many common names — for example Name, Email or Course. You can match any column by hand in Step 6.
3. Add your data row by row
Step 2: Format Dates
Accepted formats:
| Format | Example |
|---|---|
| Year-month-day | 2025-01-15 |
Day and month as numbers, separated by /, - or . | 15/01/2025, 01-15-2025 |
| Two-digit year (00–69 means 2000–2069, 70–99 means 1970–1999) | 15/01/25 |
| Written date, in English | January 15, 2025 |
| Excel date number | 45672 (= 2025-01-15) |
Day first or month first? CertLister checks the dates in the first 20 rows. If one of them can only be read one way — 25/01/2025 can only be day first — the whole file is read that way. If none of them can tell (every date looks like 03/04/2025), or they disagree, the Map columns step asks: "Your dates could be read either way (for example 03/04/2026). Which is it?" Choose Day / Month / Year or Month / Day / Year.
This check only runs on date columns CertLister recognized by name. In a date column you matched by hand, numeric dates are read month first.
Will cause errors:
- A date that doesn't exist, like
31/02/2025 - A year with 1 or 3 digits
Tip: YYYY-MM-DD is never ambiguous.
How to format in Excel:
- Select date columns
- Right-click → Format Cells
- Choose "Custom"
- Enter format:
yyyy-mm-dd - Click OK
Step 3: Verify Category Names
Matching ignores capitalization and spaces before or after the name. Spelling must match.
Check your categories:
- Log into CertLister
- Go to Categories page
- Note the exact spelling
Example:
- Matches "Safety Training": "safety training", "SAFETY TRAINING"
- Doesn't match: "Safety Trainings" (extra s)
New categories:
- A name that matches none of your categories opens a dialog where you choose what to do
- See "Category Handling Dialog" section below for details
Step 4: Save as CSV
In Excel:
- Click File → Save As
- Choose file type: CSV UTF-8 (Comma delimited) (*.csv) — it keeps accented letters such as é and ñ
- Name your file (e.g., "credentials_jan2025.csv")
- Click Save
- If Excel warns about features, click Yes (CSV format is correct)
Files that use semicolons instead of commas also work.
In Google Sheets:
- Click File → Download → Comma Separated Values (.csv)
- File downloads to your computer
Step 5: Upload to CertLister
1. Go to Credentials Page
- Click Credentials in the left navigation
2. Click "Import CSV"
- It is at the top of the page. Only the Admin and Manager roles see it
3. Upload Your CSV File
- In the Import credentials dialog, drag your file onto the upload area, or click Select CSV file
- The file browser shows only
.csvfiles
Step 6: Check the Column Mapping
The Map columns step lists each CertLister field next to the CSV column matched to it. Matches CertLister found on its own are marked Auto-detected.
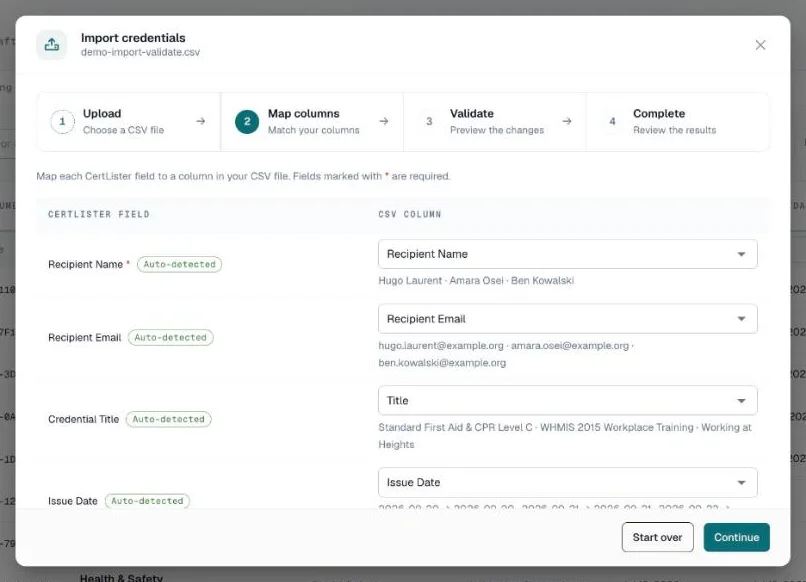
- Change any match from its dropdown, or choose Not mapped
- Recipient Name must be mapped before you can continue
- If Credential Title or Issue Date isn't mapped, rows that would create a new credential are rejected. Rows that update an existing credential still import
- Columns you don't map are not imported. They are listed under "These columns aren't mapped and won't be imported"
- A second table below — Custom fields — lists every custom field your categories define, so you can map a CSV column to each the same way
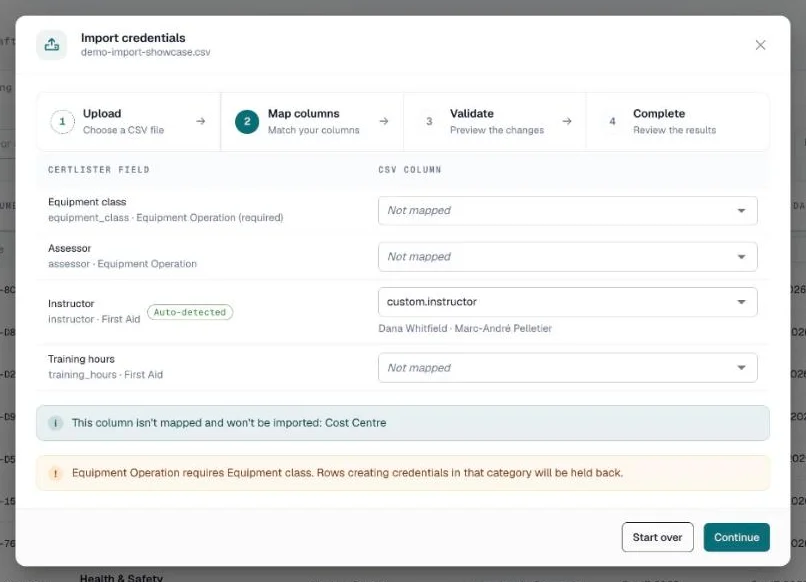
Click Continue. A file with more than 2,000 rows stops here: "This file has 2500 rows. Import up to 2000 at a time — split it and import in parts."
Step 7: Fix Errors (if any)
The Validate step sorts your rows into tabs — see "Update Confirmation Dialog" below for the full list. Rows under Validation errors won't import; everything else still can.
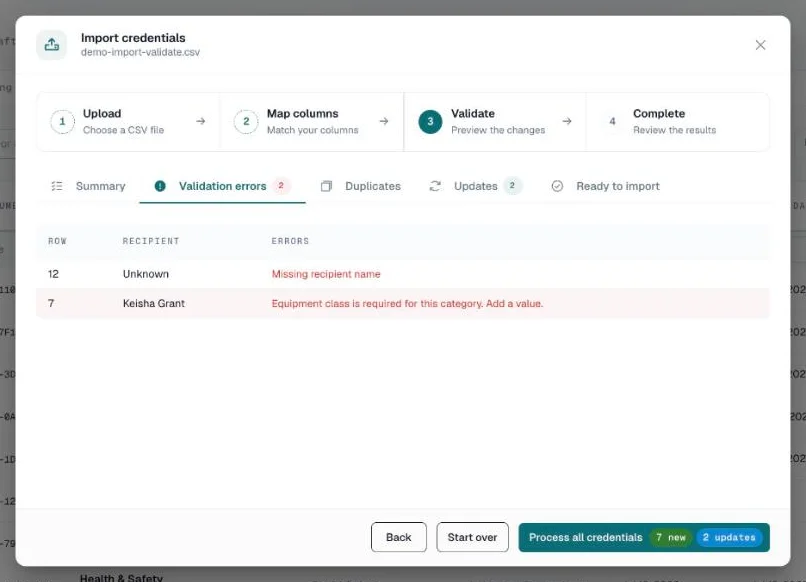
Common errors:
| Message | Fix |
|---|---|
| Missing recipient name | Fill in the name, or delete the empty row |
| Invalid issue date: … or Invalid expiry date: … | Use a format from Step 2 |
| Expiry date must be after the issue date | Correct one of the two dates |
| Invalid status: … (use active, expired, revoked) | Use one of those three words, or leave the cell empty |
| Missing credential title | Fill in the title, or give the category a default title |
| Missing issue date | Fill in the issue date |
To fix:
- Open your CSV file
- Fix the errors
- Save again
- Click Start over and upload the file again
Step 8: Confirm Import
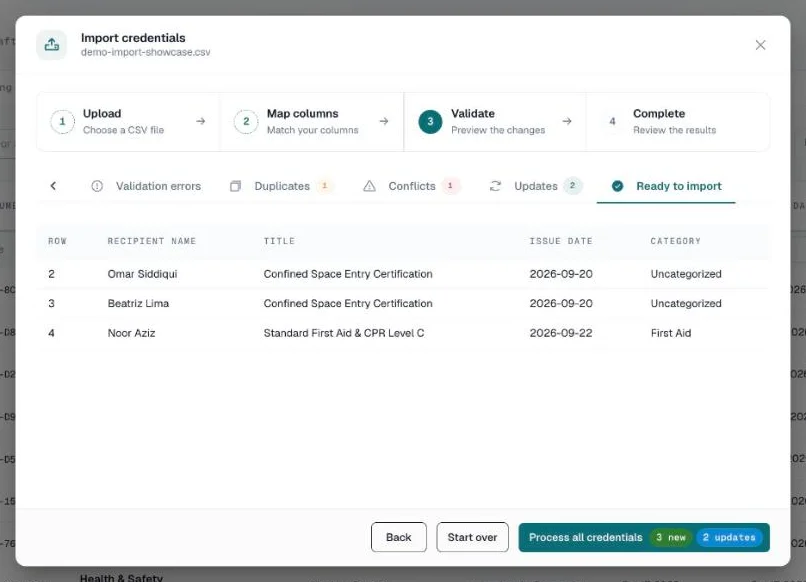
- Check the Ready to import and Updates tabs
- Unless you're on Pro, check the credits line — for example "This import will use 12 credits (you have 40)". If you don't have enough, it tells you how many new credentials will be imported and how many skipped
- Click Process all credentials
- If your file names categories you don't have, the category dialog opens. If rows update existing credentials, the update confirmation dialog opens. Both are described below
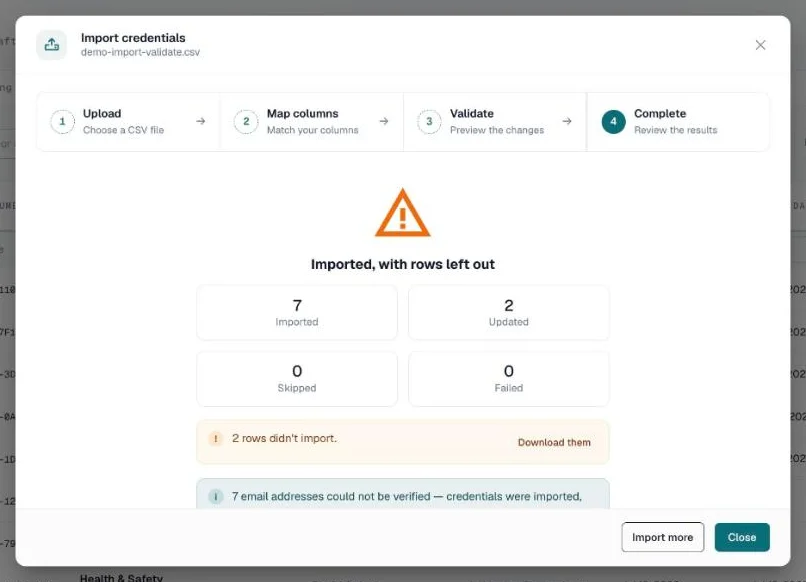
Step 9: Verify Success
After the import, you'll see:
- Title: "Credential processing complete", or "Imported, with rows left out" when some rows didn't import
- Counts: Imported, Updated, Skipped and Failed
- Rows left out: "3 rows didn't import." with Download them — a CSV listing each row, its recipient name and the reason
- Credits: if you ran out, "4 credentials were skipped — you didn't have enough credits." with a button to buy credits and import the rest
Click Import more to import another file, or Close.
Next steps:
- Go to the Credentials page
- Filter by category to see your imported credentials
- Spot-check a few for accuracy
- Generate PDFs and send the credentials — importing does neither (see "After Importing" below)
Category Handling Dialog
What happens when your CSV includes categories that don't exist in CertLister?
When you click Process all credentials, a Category assignment dialog opens first. It lists every category name in your file that matches none of your categories.
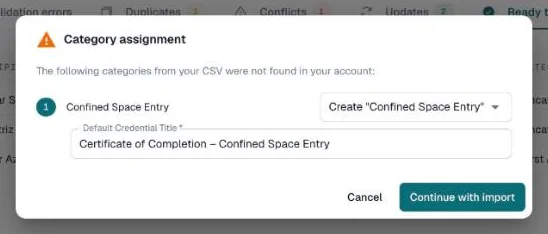
Your Choices
Each name has a dropdown:
| Choice | What happens |
|---|---|
| Create "name" (the default) | A new category is created with that name, and those rows go into it. Enter a Default Credential Title for it — the dialog can't continue without one |
| One of your existing categories | Those rows go into that category instead. Use this for typos such as "Safety Trainings" |
| Leave blank | Those rows get no category |
When the file has more than one new name, Create all of them sets every name to Create.
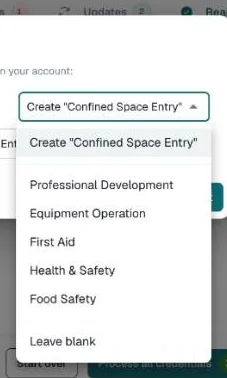
How to Respond to the Dialog
- Review the list of category names
- Check for typos (e.g., "Safety Training" vs "Safety Trainings") and point them at the existing category
- Enter a default title for each category you create
- Click Continue with import, or Cancel to close the dialog without importing anything
Update Confirmation Dialog
What happens when rows in your CSV would change credentials you already have?
A row updates an existing credential when it has that credential's number, or when it matches one by the rule in Updating Existing Credentials above and has at least one different value. Nothing is written until you confirm.
The Validate Step
After Map columns, the Validate step sorts every row of your file into tabs:
| Tab | What it lists |
|---|---|
| Summary | How many rows fall into each of the tabs below |
| Validation errors | Rows that cannot be imported as they are — for example, a missing recipient name or a date that cannot be read |
| Duplicates | Rows that match an existing credential and change nothing. They are skipped. |
| Conflicts | Rows held back: two rows describe the same credential, or a row matches more than one existing credential. Shown only when there are some. |
| Updates | Rows that will change an existing credential, with each change listed — for example Expiry Date: 2026-01-15 → 2027-01-15. Shown only when there are some. |
| Ready to import | Rows that will create new credentials |
Rows under Validation errors, Duplicates and Conflicts are not imported.
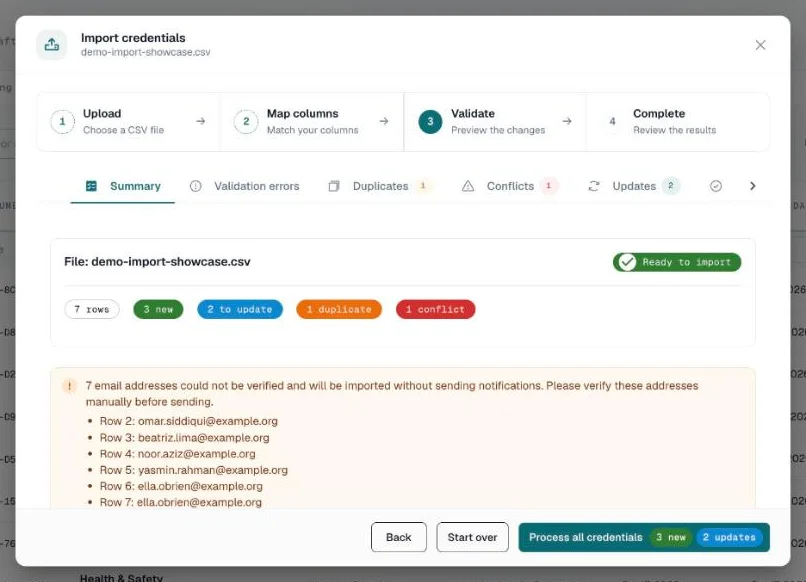
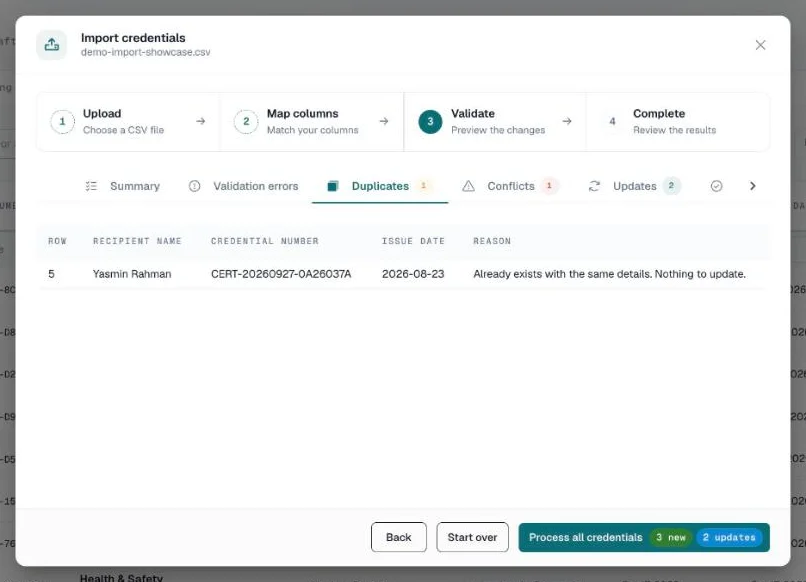
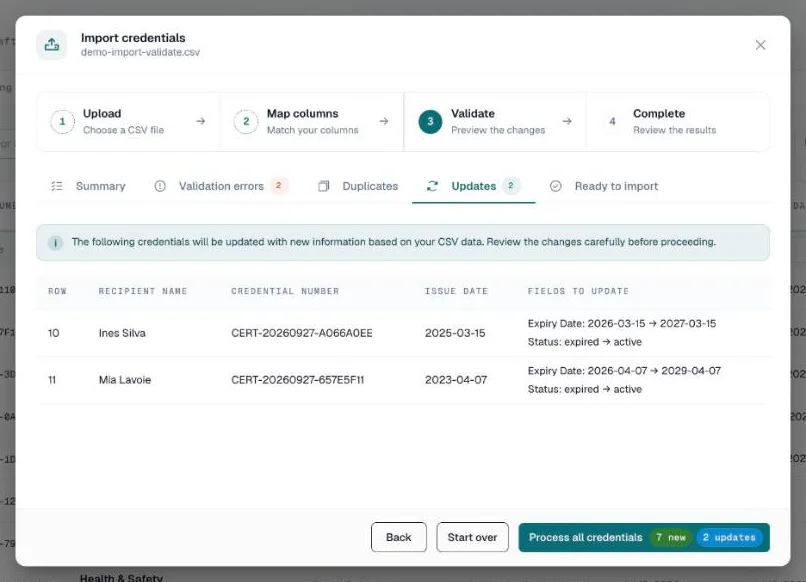
Confirm Changes to Existing Credentials
When you click Process all credentials and at least one row will update a credential, a dialog opens before anything is saved. If your file names a category that does not exist yet, the category dialog comes first.
The dialog shows:
- Its title: Confirm changes to existing credentials
- How many existing credentials your import updates
- Two counts: New credentials and Credentials to update
- What changes, counted by field — for example "1 status, 2 category assignments"
- A warning: Updates cannot be undone.
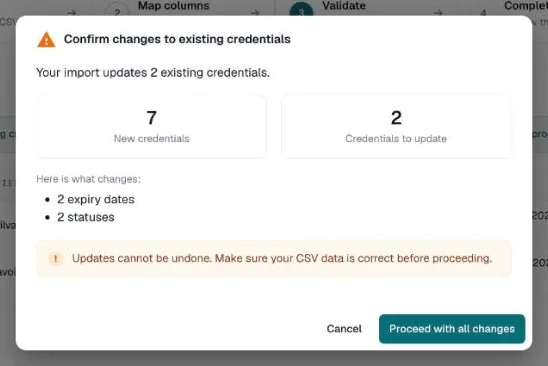
Example:
Confirm changes to existing credentials

Your import updates 3 existing credentials.

  4 New credentials    3 Credentials to update

Here is what changes:
  • 2 expiry dates
  • 1 status

Updates cannot be undone. Make sure your CSV data is correct
before proceeding.

                          [Cancel]  [Proceed with all changes]
The buttons:
- Cancel closes the dialog. Nothing is imported, and you stay on the Validate step.
- Proceed with all changes creates the new credentials and applies every update on the Updates tab.
Keeping a Credential Unchanged
There is no option to import the new credentials and skip the updates. Proceed with all changes applies all of them. To stop a row from updating a credential:
- Open the Updates tab and note which rows change what
- In your CSV, delete that row, or set its values back to what the credential already has
- Click Start over and upload the corrected file
A row whose values match the credential exactly moves to Duplicates and changes nothing. Do not just empty the cell: an empty cell in a column your file includes clears that field.
Best Practice
Before importing updates:
- Export existing credentials as CSV
- Compare with your import file
- Verify changes are intentional
- Proceed with update
Batch Processing
CertLister saves an import row by row.
How It Works
- One file can hold up to 2,000 rows
- Each row is saved on its own. If one row fails, the others are still saved, and the failed row is counted under Failed
- A progress bar shows while the import runs
Large Files
- More than 2,000 rows: split the file. The Map columns step refuses a larger one
- Checking takes too long: "Couldn't finish checking your file in time. Split it into smaller files and try again."
- The import stops partway: "Couldn't finish the import. Some rows may already have been imported — check your credentials before trying again." Check the Credentials page before you import the file again
Advanced Tips
Tip 1: Import in Batches
Don't import all at once if you have 500+ credentials (one file holds up to 2,000 rows)
Instead:
- Batch 1: 100 credentials (test)
- Review for accuracy
- Batch 2: 200 credentials
- Batch 3: Remaining credentials
Why: Easier to fix errors, less risk if something goes wrong
Tip 2: Use Templates
Save time with a template CSV:
Click Download template in the import dialog for an empty file with the column names, or reuse a file that worked:
- Do your first import
- Save the CSV file as a template
- For future imports:
- Copy the template
- Replace data, keep headers
- Import
Template file: credential_import_template.csv
Tip 3: Calculate Expiration Dates
Excel formula for automatic expiration dates:
For 2-year certifications (CPR example):
=DATE(YEAR(E2)+2, MONTH(E2), DAY(E2))
Where E2 is the Issue Date cell (column E in the template).
Example:
- Issue date (E2): 2025-01-15
- Formula result: 2027-01-15
Apply to entire column:
- Enter formula in first cell
- Drag down to copy
Tip 4: Remove Duplicates Before Importing
In Excel:
- Select your data
- Go to Data → Remove Duplicates
- Choose columns to check (e.g., Recipient Name + Title + Issue Date)
- Click OK
In Google Sheets:
- Select your data
- Go to Data → Data cleanup → Remove duplicates
- Choose columns
- Click Remove duplicates
Tip 5: Use Conditional Formatting
Color-code your data for easier review:
In Excel:
- Select date columns
- Go to Home → Conditional Formatting
- Create rule: "Dates before today" = Red (already expired)
- Create rule: "Dates in next 30 days" = Yellow (expiring soon)
Helps you catch data entry errors before importing.
Troubleshooting
No Import CSV button
Problem: You don't see Import CSV on the Credentials page.
Reason: Your role is User. Only the Admin and Manager roles can import. Every plan includes import.
Solution:
- Ask an Admin to change your role in Settings → Team
Not enough credits
Problem: The Validate step says some new credentials will be skipped.
Why: On Free and Basic, each new credential uses 1 credit. Updates to existing credentials are free.
Solutions:
- Import anyway: new credentials are imported in file order until your credits run out. The results screen then offers Buy credits & import the remaining ones
- Click Buy credits on the Validate step first
- Delete old or test credentials — deleting a credential refunds its credit if it came from this month's allowance or a purchased pack
- Upgrade to Pro (unlimited)
"Duplicate credential found"
Problem: A row describes a credential you already have.
Detection: CertLister matches a row by its credential number. For a row without one, it uses the same rule as issuing a credential by hand:
- the recipient's name and email
- the category
- the credential title
- the issue date
A column that is not in your file is left out of the match. A revoked credential is matched only when nothing else is.
What happens:
- A row identical to an existing credential is skipped and listed under Duplicates
- A row that would change a credential but matches more than one is held back under Conflicts, so nothing is updated by guesswork
Solutions:
- Remove the rows you have already imported
- To update a specific credential, add the
Credential Numbercolumn - If the credentials are genuinely separate, check the title, category and issue date — a different value in any of them makes a new credential
Some rows didn't import
Problem: The results show fewer credentials than rows in your file.
Common reasons:
- Duplicates — identical to a credential you already have
- Validation errors (see Step 7)
- Conflicts (see "Duplicate credential found" above)
- Not enough credits
How to see which:
- On the results screen, click Download them next to "rows didn't import"
- The CSV lists each row number, recipient name and reason
- Duplicates are not in that file — they are on the Duplicates tab of the Validate step
- Fix the rows and import just those
Day and month swapped
Problem: 3 April was imported as 4 March, or the other way round.
Why: The dates were read in the wrong order — for example, the wrong answer to the question in the Map columns step, or day-first dates in a column you matched by hand (those are read month first).
To fix:
- Use
YYYY-MM-DDdates in the file - For credentials already imported: import a file with the
Credential Number,Issue DateandExpiry Datecolumns, holding the correct dates. Each row updates its credential
Categories not matching
Problem: Some credentials imported but not in the category you expected.
Reasons:
- Leave blank was chosen for that name in the category dialog
- A typo was created as a new category ("Safety Trainings")
- The Category column wasn't mapped
Capitalization and spaces before or after the name are not the cause — matching ignores them.
Solution:
- Go to Credentials page
- Select the credentials to move
- Click Category in the bulk action bar and choose the right category
CSV file won't open in CertLister
Problem: Upload fails or shows error.
Solutions:
Check the file type - Save as
.csv. An Excel workbook (.xlsx) can't be readCheck the header row - The first row must hold the column names. If CertLister finds none, you'll see "Couldn't read the columns in that file. Check it's a CSV with a header row."
Check the row count - Up to 2,000 rows per file
- Split larger files and import them one at a time
Check encoding - Save as UTF-8, or accented letters come through garbled
- Excel: Save As → CSV UTF-8 (Comma delimited)
- Google Sheets: Already UTF-8
Import Limits
Rows per File
- Maximum: 2,000 rows per file
- For larger imports: Split into multiple files
Credits
- Each new credential: 1 credit on Free and Basic
- Updates to existing credentials: free
- Pro: unlimited
- Details: Plans & Billing
Who Can Import
- Plans: all
- Roles: Admin and Manager
After Importing
Step 1: Quality Check
Spot-check 5-10 random credentials:
- Open credential details
- Verify name, title, dates are correct
If errors found:
- Edit individual credentials
- Or delete the batch and re-import with corrections
Step 2: Generate PDFs and Send (if needed)
Importing creates the credentials only. It doesn't make PDFs or email anyone.
To generate PDFs:
- On the Credentials page, select the imported credentials and click Generate PDFs in the bulk action bar
- Details: generating PDFs in bulk
To send them: select the credentials and click Send emails in the bulk action bar.
Step 3: Organize with Categories
After import:
- Review category distribution (Dashboard or Categories page)
- Merge categories if you created duplicates
- Rename categories for consistency
Examples
Example 1: After Group CPR Training
Scenario: 30 employees completed CPR training on January 15, 2025. Credentials expire in 2 years.
CSV:
Credential Number,Title,Recipient Name,Recipient Email,Issue Date,Expiry Date,Status,Category
,CPR Certification,John Smith,,2025-01-15,2027-01-15,active,Safety Training
,CPR Certification,Sarah Johnson,,2025-01-15,2027-01-15,active,Safety Training
,CPR Certification,Michael Chen,,2025-01-15,2027-01-15,active,Safety Training
Result: 30 new credentials — one credit each, unless you're on Pro.
Example 2: Migrating Historical Data
Scenario: Moving 500 credentials from old Excel spreadsheet to CertLister.
Steps:
- Clean up Excel data (remove blank rows, fix dates)
- Add column headers to match CertLister format
- Save as CSV
- Test import with first 50 credentials
- Review for accuracy
- Import remaining 450 in batches of 100
Time: 1-2 hours (vs. 40+ hours creating manually)
Example 3: Annual Renewals
Scenario: 100 people renewing Food Safety certification annually.
Process:
- Export last year's credentials with Export CSV on the Credentials page
- Delete the
Credential Numbercolumn. With it, each row updates last year's credential instead of creating a new one - Delete the
Statuscolumn too, or set every cell toactive— a credential exported asexpiredwould be imported asexpired - Update issue dates (new year)
- Update expiration dates (new year + 1)
- Import — each row creates a new credential
Best Practices
Do
- Test first - Import 5-10 credentials as a test batch
- Use templates - Save a working CSV as a template
- Validate dates - Double-check date format
- Back up - Keep original CSV files
- Document - Note what each import was for
Don't
- Rush - Take time to prepare data correctly
- Skip validation - Always review before confirming
- Import duplicates - Check for existing credentials first
- Use complex formatting - Keep CSV simple (no formulas, colors, etc.)
- Assume - Verify categories, dates, and names
Data Cleanup Checklist
Before importing, review your data:
- A Recipient Name column, plus Title and Issue Date for new credentials
- Dates in a format from Step 2 (YYYY-MM-DD is safest)
- Names capitalized consistently
- Credential titles standardized
- Categories match existing ones (or intentional new ones)
- No Credential Number column if every row should create a new credential
- File saved as CSV UTF-8 (not .xlsx)
- 2,000 rows or fewer
Next Steps
1. Practice with Small Test
Before big import:
- Create a CSV with 5 test credentials
- Import them
- Review results
- Delete test credentials (this refunds their credits if they came from this month's allowance or a purchased pack)
- Now import your real data
2. Set Up Bulk Operations
Learn other bulk features:
- Bulk delete
- Bulk export
- Bulk category updates
- Bulk PDF generation