Bulk Credential Generation: How to Issue Hundreds of Credentials in Minutes
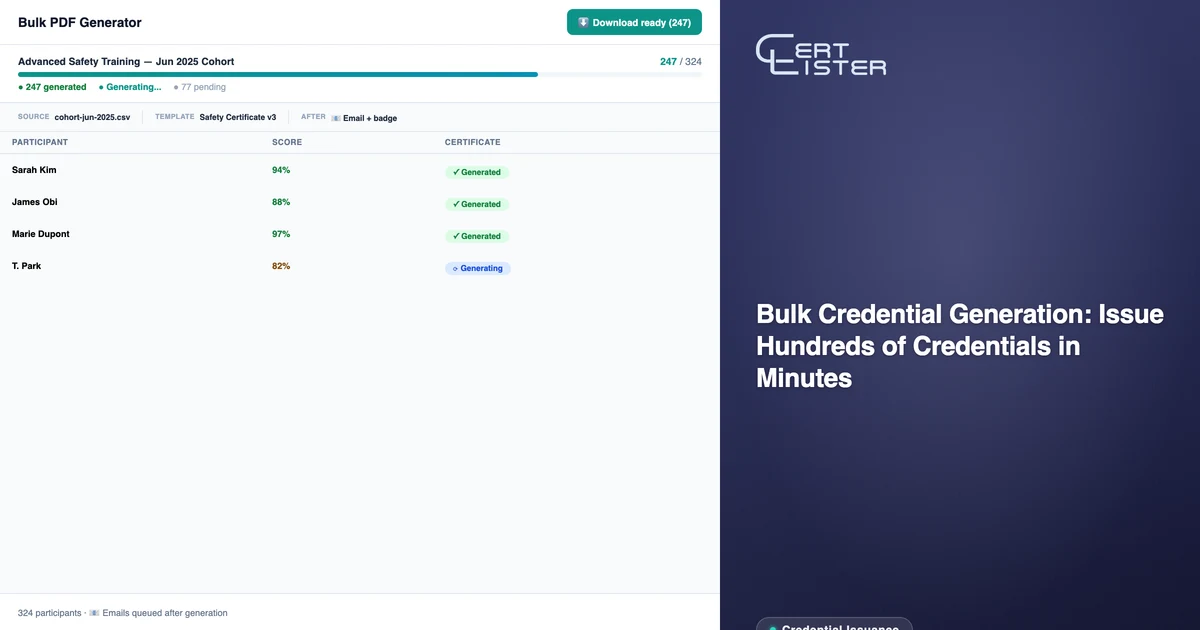
Issuing credentials one at a time is reasonable when you're handling a handful of recipients. It doesn't work when you're finishing a cohort of 200 people, running quarterly compliance renewals, or onboarding a new client with 500 existing certification records to migrate.
Bulk generation in CertLister handles volume issuance without compromising the quality of individual credentials on this digital credential platform. Each recipient still gets a properly named, branded, QR-coded PDF. You just don't have to produce them one at a time. Bulk PDF generation is one of the credential creation tools in CertLister's certification tracking and verification software.
Here's how the full workflow looks, from importing your data to delivering credentials to recipients.
Step 1: Prepare Your CSV
The fastest path for bulk issuance starts with a spreadsheet. CertLister's CSV importer accepts any spreadsheet you can export from Excel, Google Sheets, or your existing training management system.
The only column you have to map is Recipient Name. To create new credentials you also need Issue Date, and Title unless the category already carries a default title. Everything else is optional: recipient email, expiry date, credential number, status, category, and values for any custom fields your category defines.
A few formatting notes:
- Dates should be in
YYYY-MM-DDformat (e.g., 2026-05-29) or standard date formats — the importer handles most variants - Email addresses must be valid — invalid emails will be flagged in the validation step and won't import
- Each row becomes one credential record
You don't need to use every optional column. Start with the required fields; you can always add custom fields later.
Step 2: Import into a Category
In CertLister, credentials live inside categories. A category defines the credential template, the custom fields available, and the default settings (issue date logic, automation rules, badge design). Before importing, make sure you have a category set up for the credential type you're issuing.
To import:
- Go to Credentials and click Import CSV (Admins and Managers see it)
- Upload your CSV file
- On the Map columns step, match your CSV columns to CertLister fields. If your header names match, this happens automatically. A Category column puts each row in the right category, so one file can fill several
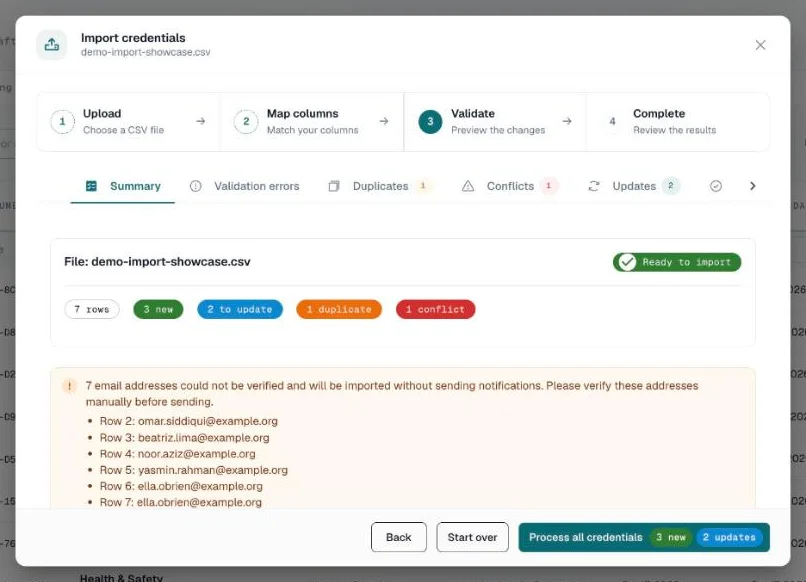
- Review the validation summary — the importer sorts rows into tabs: ready to import, updates to existing credentials, duplicates, conflicts, and errors such as a missing name or a date it can't read
- Fix any rows with errors in your file and start over, or import the rest and leave them out
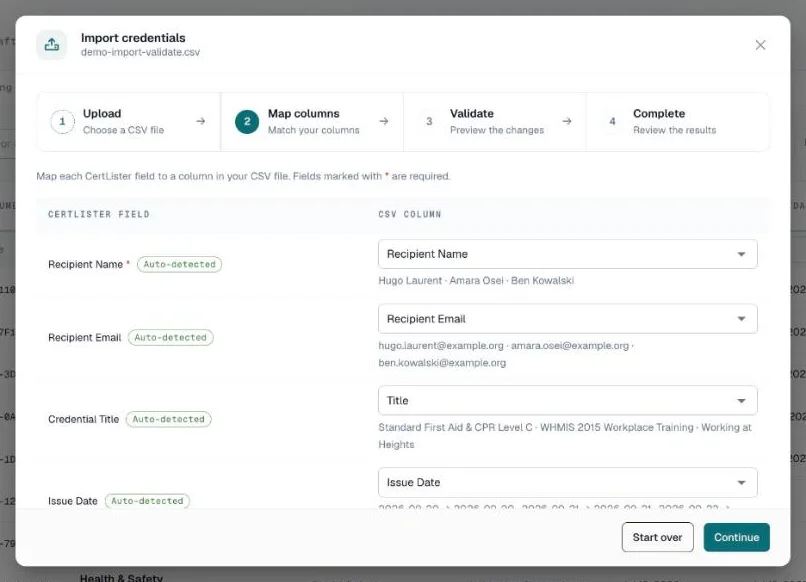
Check the mapping before you continue, particularly for dates and any custom fields.
Step 3: Generate PDFs in Bulk
Importing creates credential records, but it doesn't generate PDFs immediately. PDF generation is a separate step — this lets you review the imported records before committing to a full generation run.
To generate PDFs in bulk:
- On the Credentials list, set the PDF filter to Missing, and filter by category if you want
- Tick the checkbox in the table header, then click Select all N in the selection bar to take every matching credential across all pages (up to 500 per batch)
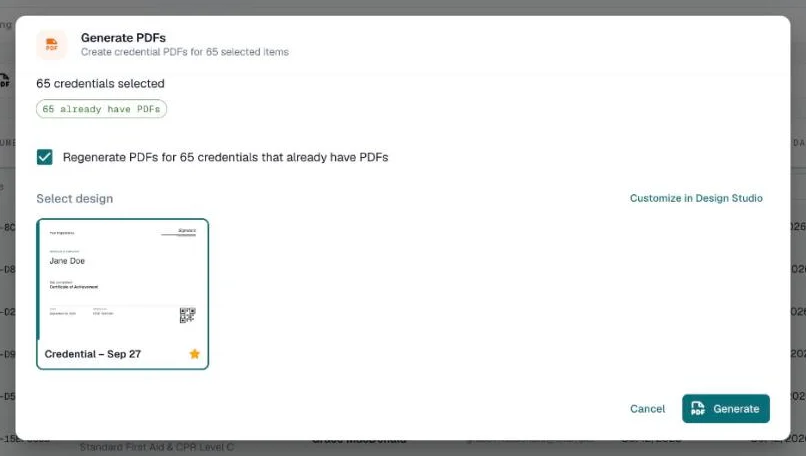
- Click Generate PDFs in the selection bar
- In the dialog, check the count and pick the design, then click Generate
- A progress strip above the list shows how far the batch has got. It runs in the background, so you can keep working

Once generation completes, each credential has a downloadable signed-URL PDF and a QR code that points to the public verification page.
Step 4: Send Credentials to Recipients
With PDFs generated, you have two options for delivery.
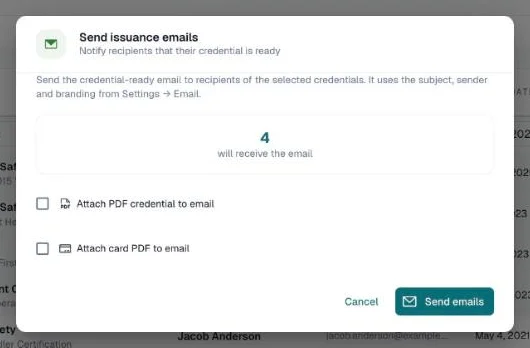
Option A: Batch email. Select your credentials and click Send emails in the selection bar. Each recipient gets an individual email with a link to their credential, and the PDF attached if you tick Attach PDF credential to email. It uses the email template you've configured under Settings → Email. The emails go out individually — each recipient sees only their own credential, not a group email.
Option B: Let recipients self-serve. If you have the recipient portal enabled, you can skip sending individual emails entirely. Recipients can log into the portal, see all credentials issued to their email address, and download their PDF directly. Some organizations prefer this approach for recurring issuances — recipients know to check the portal rather than waiting for an email.
Handling Large Volumes
For very large imports — 1,000+ records — a few practices keep things clean:
Import in batches if your data is messy. A CSV with 50 rows is much easier to validate and correct than one with 1,000. If your data comes from multiple sources or isn't well-cleaned, importing in smaller batches makes error handling more manageable.
Use the REST API for ongoing programs. If you're issuing credentials for a recurring program — a weekly training course, a monthly cohort — the REST API (Pro) lets your registration system or LMS create credential records the moment someone completes, with automated credential delivery sending the issue email right away. No import step at all for ongoing operations. And if your courses run on Moodle, the native integration issues credentials on course completion without any API work.
Filter before generating. If you've imported a large batch but only want to generate PDFs for a subset (e.g., records with a specific issue date or status), use the filter and search tools on the Credentials list before selecting. Generating PDFs for records that aren't ready yet wastes time and can confuse recipients.
What Each Recipient Gets
At the end of the bulk workflow, each recipient in your import has:
- A credential record in CertLister with their name, credential title, issue date, expiry date, and any custom fields
- A generated PDF credential with your organization's branding, their details, a QR code, and a unique credential number
- A verification URL — a permanent public link to their credential that anyone can use to confirm authenticity
- (If enabled) access to the recipient portal, where they can download the PDF, get their badge file, and share to LinkedIn
For ongoing programs with expiry dates, pairing bulk issuance with a system for tracking issued credentials ensures nothing lapses unnoticed.
The QR code on each PDF links directly to the public verify page for that credential. Recipients don't need to keep the PDF safe — anyone can verify from the QR code alone.
Bulk generation is designed to make the high-volume case as fast as the low-volume one. The import step takes 5 minutes, PDF generation takes 1–3 minutes per hundred records, and delivery is a single bulk send. What previously took an afternoon now takes less time than a coffee break.
See it in action. No card, no commitment
Join schools, companies, and training centers using CertLister. Free plan available, no credit card required.
Get Started Free