How to Set Up a Self-Service Credential Portal for Your Recipients
Every credential your organization issues creates a support obligation. Recipients email asking for re-sends. They lose the original PDF and need another copy. They want a shareable link for LinkedIn and don't know where to find it. They change email addresses and lose access entirely.
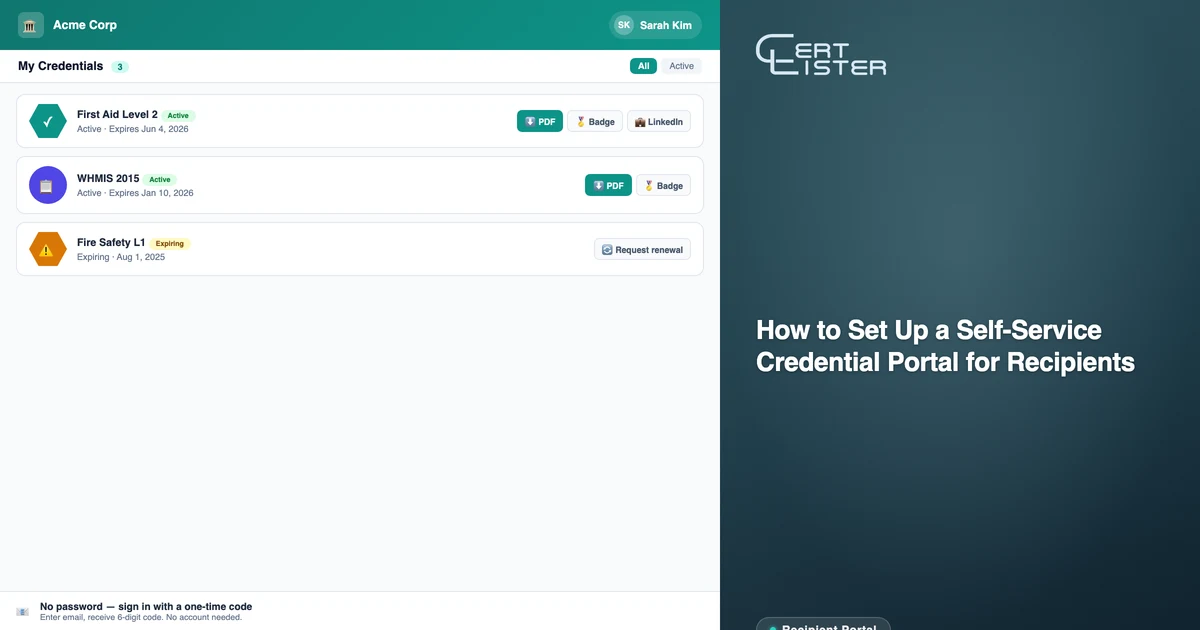
The solution is a self-service portal — a place where recipients can log in, see every credential they've earned, download PDFs, get their badge files, and share to LinkedIn, all without contacting anyone on your team.
CertLister's recipient portal does this out of the box. Here's how to set it up and what your recipients will experience once it's live.
What the Recipient Portal Does
Before walking through setup, it's worth being clear on what the portal actually gives recipients access to:
- All credentials in one place. Every credential issued to a recipient's email address appears in their portal, regardless of which category or cohort it came from.
- PDF download. One-click download of the credential PDF, without needing to email you for a re-send.
- Badge download. If your organization issues digital badges, recipients can download the OB3 badge file directly. Not sure which format to offer? See digital badges vs PDF credentials for a comparison.
- LinkedIn share. A direct LinkedIn share flow that pre-fills the issuer name, issue date, and credential URL.
- Verification link. A permanent, shareable URL for each credential that anyone can use to verify authenticity.
- Credential requests (Pro). Recipients can submit requests to your organization — to update their name on a credential, to request a new category of credential, or to flag an issue. Requests appear in your admin inbox.
Step 1: Enable the Recipient Portal
The portal is enabled at the organization level. Go to Portal Settings in your CertLister dashboard.
On the Portal Configuration tab, toggle on Enable recipient portal. Once enabled, your portal is live at:
certlister.com/portal/[your-org-slug]
You can find your org slug under Settings → Customization → Slug.
At this point, any recipient with credentials in your account can log in. They authenticate with email OTP — they enter their email address, receive a one-time code, and gain access to all credentials issued to that address. No password to set, no account to create in advance.
Step 2: Customize the Portal Appearance
Under Portal Settings → Portal Configuration, you can configure:
Organization name and logo. These appear in the portal header. Make sure your logo is uploaded under Settings → Organization so it renders correctly.
Portal welcome message. A short text block shown to recipients when they log in. Use this to explain what the portal is and what they can do with it. Something like: "Here you'll find all credentials issued to you by [Organization Name]. You can download your PDFs, get your badge files, and share to LinkedIn."
Verification page layout (Pro). Choose between the Classic, Portal, and Brand layouts for how credentials appear when recipients share their verification link publicly.
Step 3: Set Up the Verification Page
The portal and the public verification page are connected — when a recipient shares a credential from the portal, the link points to your verification page. Take a few minutes to make sure your verification page is configured correctly.
Under Settings → Customization, set:
- Organization display name — shown as the issuer on the verify page
- Brand color — used for the verify page header and accents
- Verify page layout — Classic (simple, clean), Portal (card-based, with recipient branding), or Brand (full-width logo treatment)
If you're on the Pro plan, you can also remove CertLister branding from the verify page so it reflects your organization entirely.
Step 4: Add the Portal Link to Your Credential Emails
The portal is only useful if recipients know it exists. The easiest way to drive traffic there is to include a link in the email recipients receive when a credential is issued.
Under Settings → Email, edit your email template. Add a line pointing to your portal:
Access your credential portal at any time: certlister.com/portal/[your-slug]
Recipients who bookmark this link can return any time to access all their credentials — current and future.
Step 5: Embed the Portal on Your Own Website (Optional)
If you want recipients to access credentials directly from your organization's website rather than navigating to certlister.com, you can embed the portal using the widget.
Under Portal Settings → Embed Widget, copy the embed code snippet. It's a single <certlister-verify> web component tag that you drop into any page on your website. The widget renders a search box and portal entry point inline.
This is useful for training companies that want credential access on their own branded domain, and for associations that want to keep recipients within the member portal experience.
Managing Recipient Requests (Pro)
On the Pro plan, recipients can submit requests through the portal. Common use cases:
- Name correction — a recipient's name was misspelled in the original credential
- Reissue request — a recipient needs a credential re-issued with updated details
- New credential request — a recipient believes they qualify for a credential they haven't received yet
All requests appear in your Portal Settings → Requests inbox. Each request shows the recipient's name, email, the credential in question, and the request message. You can respond, approve, or dismiss from the inbox.
Enabling requests turns your portal from a one-way distribution channel into a two-way system — recipients can self-serve the simple things (download, share), and escalate only what needs your attention.
What Recipients Experience
Once your portal is live, a recipient's flow looks like this:
- They receive a credential email with a link to the portal
- They visit the portal URL and enter their email address
- They receive a one-time code in their email (expires in 10 minutes)
- They enter the code and gain access to their credential dashboard
- From there: download PDF, download badge, share to LinkedIn, copy verification link, or submit a request
On subsequent visits, they can log back in with the same email OTP process. There's nothing to install and no password to manage.
The Practical Impact
The credential portal eliminates an entire category of support work. Once it's live:
- Re-send requests go to zero — recipients download on their own
- "Can I get a copy for LinkedIn?" goes to zero — the share flow is built in
- "I changed email addresses and lost my certificates" goes to near zero — you can merge records under their new address
- Your admin inbox contains only things that actually need a human
For organizations issuing more than a few dozen credentials per month, the time savings from eliminating these support requests is substantial. For recipients, having a permanent, self-service record of everything they've earned is a meaningful improvement over an email attachment that might be in a deleted folder.
Set it up once. It handles itself from there.
See it in action — no card, no commitment
Join schools, companies, and training centers using CertLister. Free plan available, no credit card required.
Get Started Free