
API & Webhook Integrations
Time to read: 12 minutes
Plan required: Pro
CertLister's API & Webhook Integrations let you connect external systems — your LMS, HR platform, Zapier, Make, or any custom application — to automate credential workflows. You can push data in (create credentials via the REST API or incoming webhooks) and get notified when things happen inside CertLister (via event subscriptions). Automations cover the in-app side of the same events — see the workflow automations feature page.
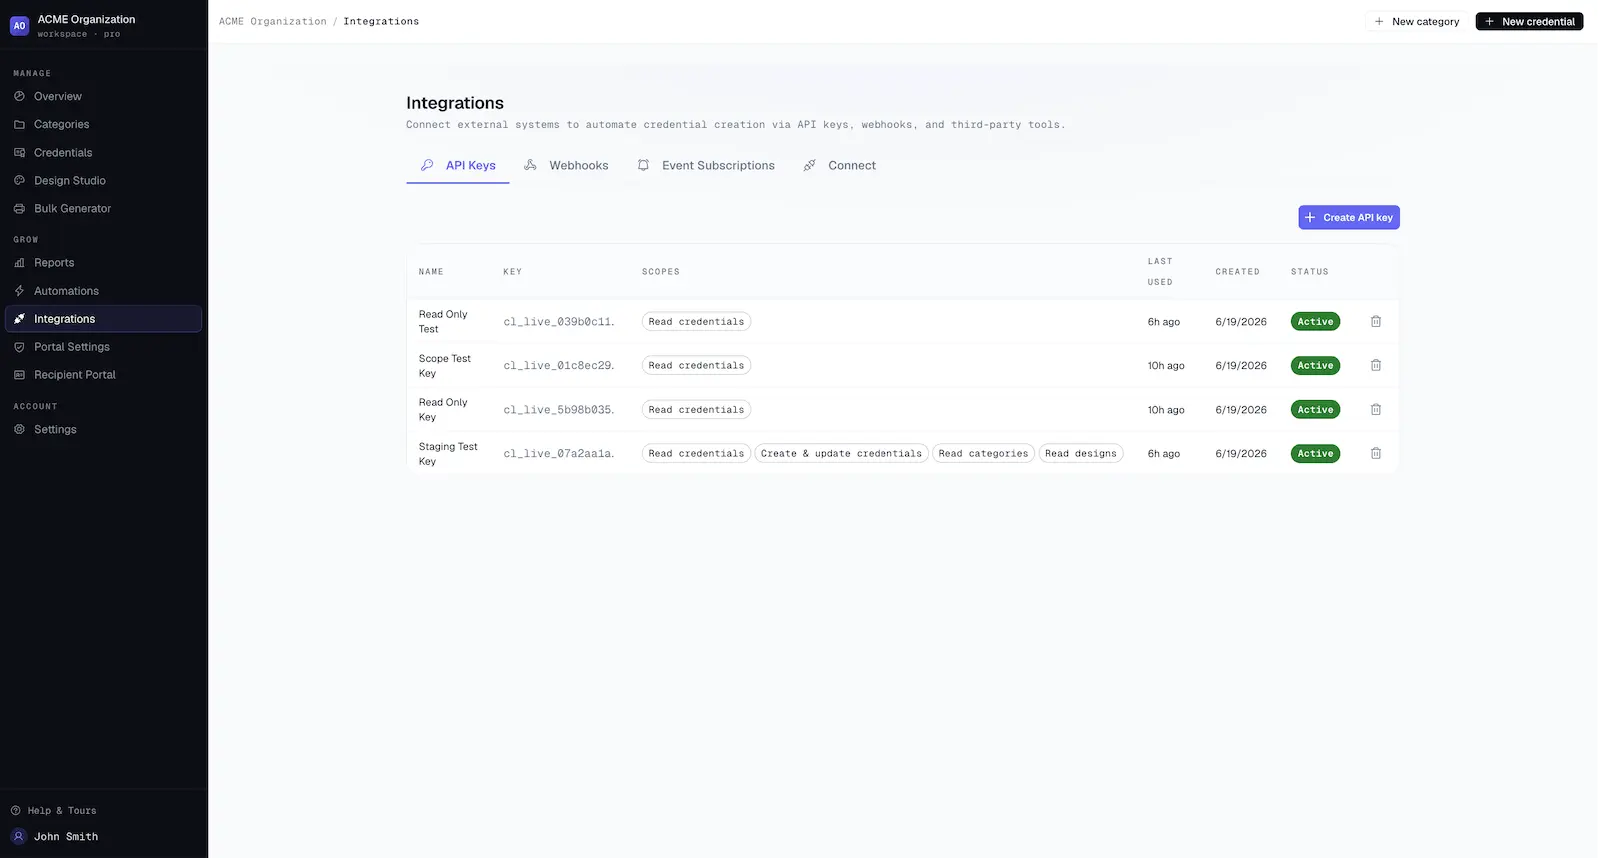
Everything lives under the Integrations page in the left sidebar (Plugs icon).
What's Included
| Feature | What it does |
|---|---|
| API Keys | Authenticate external requests to CertLister's REST API |
| REST API | Create, list, update, and revoke credentials programmatically |
| Incoming Webhooks | Receive data from external systems and automatically create credentials |
| Event Subscriptions | Get notified (via HTTP POST) when credentials are issued, revoked, or expired |
| Connect | Step-by-step guides for Zapier, Make, and code examples |
API Keys
API keys let external applications authenticate with CertLister's REST API. Each key has specific permissions (scopes) that control what it can do.
Creating an API Key
- Go to Integrations → API Keys tab
- Click Create API key
- Enter a name (e.g., "Production", "Zapier", "LMS Integration")
- Select scopes — the permissions this key should have:
- Read credentials (
credentials:read) — list and view credentials - Create & update credentials (
credentials:write) — create, update, and revoke credentials - Read categories (
categories:read) — list and view categories - Read designs (
designs:read) — list and view saved designs
- Read credentials (
- Optionally set an Expiration
- Click Create API key
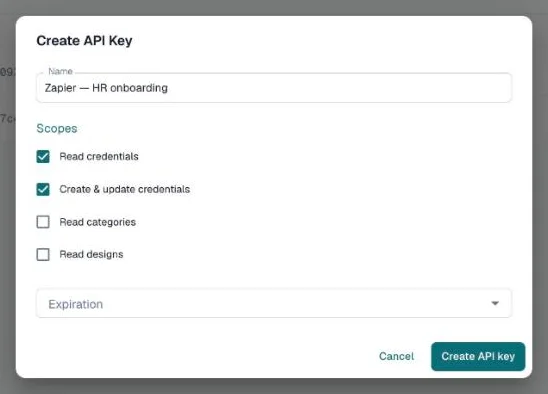
Important: The full API key is shown only once after creation. Copy it immediately and store it securely — you will not be able to see it again. CertLister stores only a hash of the key.
Key Format
API keys follow the format cl_live_ followed by 48 random characters. The cl_live_ prefix makes keys easy to identify if they appear in logs or code.
Managing Keys
The API Keys table shows:
| Column | Description |
|---|---|
| Name | The label you gave the key |
| Key | Masked prefix (first 16 characters) |
| Scopes | Permission chips showing what the key can do |
| Last Used | When the key was last used to make a request |
| Created | When the key was created |
| Status | Active or Revoked |
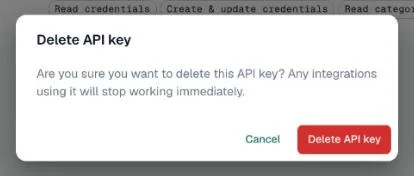
To delete a key: click the trash icon on its row and confirm Delete API key. The key stops working at once — any system using it gets 401 Unauthorized responses.
REST API
The REST API lets you manage credentials programmatically. All requests are authenticated with an API key.
Authentication
Include your API key in the Authorization header:
Authorization: Bearer cl_live_your_api_key_here
Base URL
All API endpoints are under:
https://app.certlister.com/api/v1/external/
Available Endpoints
| Method | Endpoint | Scope Required | Description |
|---|---|---|---|
POST | /external/credentials | credentials:write | Create a credential |
GET | /external/credentials | credentials:read | List credentials (paginated) |
GET | /external/credentials/:id | credentials:read | Get a credential by ID or number |
PATCH | /external/credentials/:id | credentials:write | Update credential fields |
POST | /external/credentials/:id/revoke | credentials:write | Revoke a credential |
GET | /external/categories | categories:read | List categories |
GET | /external/categories/:id | categories:read | Get category details |
GET | /external/designs | designs:read | List saved designs |
GET | /external/designs/:id | designs:read | Get design details |
Creating a Credential via API
Send a POST request to /external/credentials:
{
  "recipient_name": "Jane Smith",
  "recipient_email": "jane@example.com",
  "title": "AWS Solutions Architect",
  "category_id": "your-category-uuid",
  "design_id": "your-design-uuid",
  "issue_date": "2026-06-18",
  "expiry_date": "2027-06-18",
  "status": "active",
  "custom_attributes": {
    "course_hours": "40",
    "instructor": "John Doe"
  },
  "send_email": true
}
Only recipient_name is required. All other fields are optional. If category_id is omitted, the credential is placed in the default "Uncategorized" category.
Set send_email: true to automatically send the issuance email to the recipient.
Response Format
Success:
{
  "data": { ... },
  "meta": { "page": 1, "per_page": 25, "total": 142 }
}
Error:
{
  "error": {
    "code": "INVALID_SCOPE",
    "message": "This API key does not have the credentials:write scope"
  }
}
Error Codes
| Status | When |
|---|---|
400 | Validation error (missing required fields, invalid values) |
401 | Invalid, expired, or revoked API key |
402 | Credential limit reached for your plan |
403 | API key lacks the required scope |
404 | Resource not found |
429 | Rate limited (too many requests) |
Rate Limits
The external API allows 100 requests per minute per API key. If you exceed this limit, you'll receive a 429 response. Wait and retry after the limit resets.
Code Example — curl
curl -X POST https://app.certlister.com/api/v1/external/credentials \
  -H "Authorization: Bearer cl_live_your_api_key_here" \
  -H "Content-Type: application/json" \
  -d '{
    "recipient_name": "Jane Smith",
    "recipient_email": "jane@example.com",
    "title": "Safety Training Certificate",
    "category_id": "your-category-uuid",
    "send_email": true
  }'
Code Example — Node.js
const response = await fetch(
  "https://app.certlister.com/api/v1/external/credentials",
  {
    method: "POST",
    headers: {
      "Authorization": "Bearer cl_live_your_api_key_here",
      "Content-Type": "application/json",
    },
    body: JSON.stringify({
      recipient_name: "Jane Smith",
      recipient_email: "jane@example.com",
      title: "Safety Training Certificate",
      category_id: "your-category-uuid",
      send_email: true,
    }),
  }
);

const result = await response.json();
console.log(result.data);
Code Example — Python
import requests

response = requests.post(
    "https://app.certlister.com/api/v1/external/credentials",
    headers={
        "Authorization": "Bearer cl_live_your_api_key_here",
        "Content-Type": "application/json",
    },
    json={
        "recipient_name": "Jane Smith",
        "recipient_email": "jane@example.com",
        "title": "Safety Training Certificate",
        "category_id": "your-category-uuid",
        "send_email": True,
    },
)

result = response.json()
print(result["data"])
Incoming Webhooks
Incoming webhooks let external systems send data to CertLister. When CertLister receives a webhook payload, it can automatically create a credential or trigger a workflow automation.
Creating a Webhook Endpoint
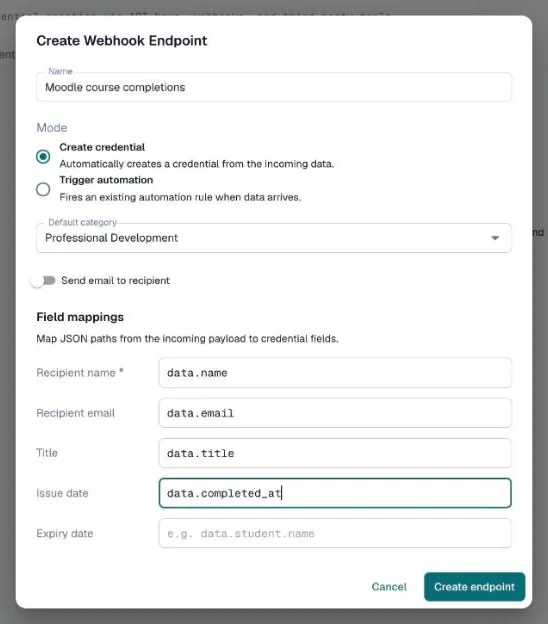
- Go to Integrations → Webhooks tab
- Click Create endpoint
- Fill in the details:
- Name — a descriptive label (e.g., "LMS Course Completion")
- Mode — Create credential (makes a credential from the incoming data) or Trigger automation (runs one of your workflow automations)
- For Create credential: pick the Default category, and switch on Send email to recipient if new credentials should be emailed
- For Trigger automation: pick the automation to run
- Under Field mappings, map fields from the incoming JSON (e.g.
data.name) to credential fields — Recipient name is required - Click Create endpoint
Webhook URL
Each endpoint gets a unique URL:
https://app.certlister.com/api/v1/hooks/your-endpoint-token
Send a POST request to this URL with a JSON payload. CertLister will process it according to your field mappings and mode.
Field Mappings
Field mappings tell CertLister how to extract data from the incoming JSON payload. Map JSON paths on the left to credential fields on the right:
| Credential Field | Required | Example JSON Path |
|---|---|---|
recipient_name | Yes | data.student_name |
recipient_email | No | data.email |
title | No | data.course_name |
issue_date | No | data.completion_date |
expiry_date | No | data.expiry |
| Custom attributes | No | data.score, data.instructor |
Signing & Verification
Each webhook endpoint has a signing secret. When you send a payload, you can include an HMAC-SHA256 signature in the X-CertLister-Signature header so CertLister can verify the request is authentic:
X-CertLister-Signature: <HMAC-SHA256 of raw request body using signing secret>
The signature is optional — unsigned requests are still processed, but the logs will show an "Unsigned" warning. For production use, always sign your requests.
You can reveal, copy, or regenerate the signing secret from the webhook endpoint card.
Testing a Webhook
Click the Test button on any webhook endpoint card. CertLister sends a sample payload to itself and shows you the result — whether the field mappings work correctly and a credential would be created.
Webhook Logs
Click the logs icon (View logs) on an endpoint card to see recent invocations:
| Field | Description |
|---|---|
| Status | HTTP response code (200 = success) |
| Timestamp | When the webhook was received |
| Processing Time | How long it took to process |
| Credential | Link to the created credential (if applicable) |
| Error | Error message (if failed) |
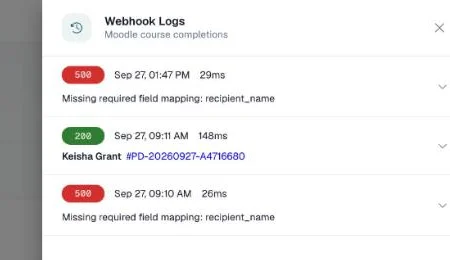
Logs are retained for the most recent 1,000 invocations per endpoint. Request bodies are truncated to 10 KB.
Rate Limits
Incoming webhooks are limited to 30 requests per minute per endpoint. This prevents accidental floods from misconfigured external systems.
Event Subscriptions
Event subscriptions let you get notified when something happens inside CertLister. You subscribe to an event type and provide a URL — CertLister will POST a signed payload to your URL every time that event fires.
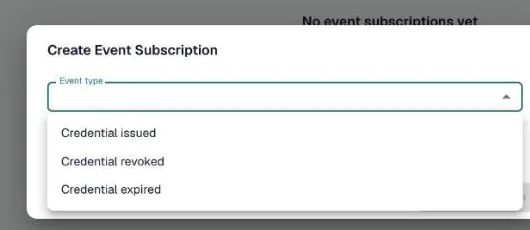
Supported Events
| Event | When it fires |
|---|---|
credential.issued | A new credential is created (via UI, API, webhook, or CSV import) |
credential.revoked | A credential's status is changed to Revoked |
credential.expired | A credential's status transitions to Expired (via the daily expiry job) |
Renewals do not have their own event. When you renew a credential, the replacement fires credential.issued, and the credential it replaces changes to Replaced without an event of its own.
You can still act on it from the event alone: every credential payload carries supersedes_id — the credential this one replaced, or null. A credential.issued event with a non-null supersedes_id is the renewal signal, and that id tells you which credential to mark no longer current.
To reconcile in bulk instead, GET /external/credentials?status=superseded lists the replaced ones.
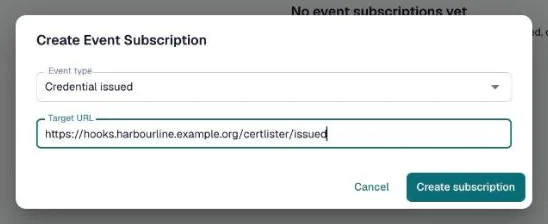
Creating a Subscription
- Go to Integrations → Event Subscriptions tab
- Click Create subscription
- Choose the Event type: Credential issued, Credential revoked, or Credential expired
- Enter the Target URL — the HTTPS endpoint that will receive the event payload
- Click Create subscription
Event Payload
When an event fires, CertLister sends a POST request to your target URL with this payload:
{
  "event": "credential.issued",
  "occurred_at": "2026-06-19T13:00:00.000Z",
  "organization_id": "your-org-uuid",
  "credential": {
    "id": "credential-uuid",
    "certificate_number": "CERT-20260619-ABC123",
    "recipient_name": "Jane Smith",
    "recipient_email": "jane@example.com",
    "title": "AWS Solutions Architect",
    "issue_date": "2026-06-19",
    "expiry_date": "2027-06-19",
    "status": "active",
    "category_id": "category-uuid",
    "supersedes_id": null,
    "revocation_reason": null
  }
}
Headers
Each delivery includes these headers:
| Header | Description |
|---|---|
Content-Type | application/json |
X-CertLister-Signature | HMAC-SHA256 signature of the request body |
X-CertLister-Event | The event type (e.g., credential.issued) |
X-CertLister-Delivery | Unique ID for this delivery attempt |
Verifying Signatures
To verify a delivery is authentic, compute the HMAC-SHA256 of the raw request body using your subscription's signing secret and compare it to the X-CertLister-Signature header:
const crypto = require("crypto");

function verifySignature(body, signature, secret) {
  const expected = crypto
    .createHmac("sha256", secret)
    .update(body)
    .digest("hex");
  return crypto.timingSafeEqual(
    Buffer.from(signature),
    Buffer.from(expected)
  );
}
Delivery & Retries
CertLister retries failed deliveries up to 3 times with increasing delays (2 seconds, 4 seconds, 8 seconds). If all retries fail, the delivery is logged as failed.
Testing a Subscription
Click the Test button on any subscription card. CertLister sends a test event with dummy credential data to your target URL. The delivery result is logged so you can verify your endpoint is working correctly.
Delivery Logs
Click View Logs on any subscription card to see delivery history:
| Field | Description |
|---|---|
| Status | Success or Failed |
| Timestamp | When the delivery was attempted |
| Event | The event type |
| Response | HTTP status code from your endpoint |
Logs follow the same retention policy as webhook logs — the most recent 1,000 deliveries per subscription.
Limits
Each organization can have up to 10 event subscriptions. Target URLs must use HTTPS.
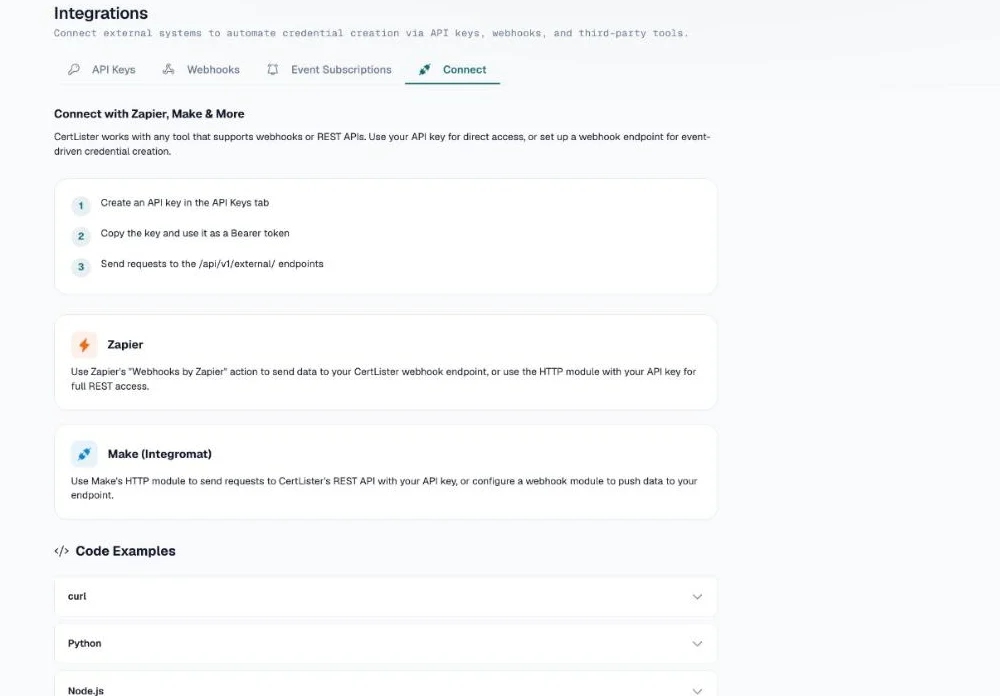
The Connect tab gathers the same setup steps, notes for Zapier and Make, and code examples in curl, Python and Node.js.
Connecting Zapier
You can connect CertLister to Zapier using the generic "Webhooks by Zapier" module. No native Zapier app is needed.
Sending Data from Zapier to CertLister
- In Zapier, create a new Zap
- Set up your trigger (e.g., "New Row in Google Sheets", "New Form Submission in Typeform")
- Add an action: choose Webhooks by Zapier → POST
- Set the URL to your CertLister incoming webhook endpoint URL
- Set Payload Type to JSON
- Map the Zap trigger fields to the credential fields your webhook expects
- Test and enable
Receiving CertLister Events in Zapier
- In Zapier, create a new Zap with trigger: Webhooks by Zapier → Catch Hook
- Copy the Zapier webhook URL
- In CertLister, create an Event Subscription with the Zapier URL as the target
- Click Test on the subscription to send a sample event to Zapier
- In Zapier, test the trigger — it should pick up the sample event
- Add your desired Zapier actions (send Slack message, update spreadsheet, etc.)
Connecting Make (Integromat)
Sending Data from Make to CertLister
- In Make, create a new scenario
- Add your trigger module (e.g., Google Sheets — Watch New Rows)
- Add an HTTP — Make a Request module
- Set URL to your CertLister incoming webhook endpoint
- Set Method to POST
- Set Body Type to JSON
- Map your trigger data to the expected JSON structure
- Run and activate the scenario
Receiving CertLister Events in Make
- In Make, create a new scenario with a Custom Webhook trigger module
- Copy the Make webhook URL
- In CertLister, create an Event Subscription with the Make URL as the target
- Click Test on the subscription to send a sample event
- In Make, click Run once to capture the test event
- Add your desired action modules
Security Best Practices
- Rotate API keys if you suspect they've been compromised. Create a new key, update your integrations, then revoke the old one.
- Use the minimum scopes necessary. Don't give a key
credentials:writeif it only needs to read data. - Set key expiration for temporary integrations or third-party tools.
- Always verify webhook signatures in production to ensure payloads are genuinely from CertLister (or your trusted source).
- Use HTTPS for all target URLs in event subscriptions.
- Store secrets securely — never commit API keys or signing secrets to version control.
Frequently Asked Questions
Q: Do I need to be on the Pro plan to use the API?
A: Yes. API keys, incoming webhooks, and event subscriptions are all Pro-only features. On Free and Basic you can still open the Integrations page and read all four tabs — the lists stay empty and every create button asks you to upgrade.
Q: Can I have multiple API keys?
A: Yes. You can create as many API keys as you need — for example, separate keys for production and staging environments, or different keys for different integrations.
Q: What happens if my API key expires?
A: Requests using an expired key will receive a 401 Unauthorized response. Create a new key and update your integration with the new credentials.
Q: Can I use the same webhook endpoint for multiple external systems?
A: Technically yes, but it's better to create separate endpoints for each system. This gives you isolated logs, separate signing secrets, and the ability to disable one without affecting others.
Q: What happens if my event subscription endpoint is down?
A: CertLister retries delivery 3 times with increasing delays (2s, 4s, 8s). If all retries fail, the delivery is logged as failed. You can check the delivery logs to see what was missed and re-process if needed.
Q: Is there a limit to how many credentials I can create via the API?
A: The API enforces your plan's credential limit. If you've reached your plan's maximum number of credentials, the API returns a 402 response. Upgrade your plan or delete unused credentials to continue.
Q: Can I use incoming webhooks without HMAC signing?
A: Yes — the signature is optional. Unsigned requests are still processed. However, for production use, we strongly recommend signing requests to verify their authenticity. Unsigned requests show a warning in the logs.
Q: Can event subscriptions trigger workflow automations?
A: Event subscriptions and workflow automations are separate systems. Event subscriptions notify external systems, while automations run internal actions (generate PDF, send email, etc.). They can both respond to the same events independently.