
Design Studio: Create Custom Credential Designs
Time to read: 10 minutes
Overview
The Design Studio is CertLister's visual credential editor. Build a fully custom credential design by placing text, attribute tokens, decorative elements, and images on a professional background — then generate print-quality PDFs for individual credentials or in bulk.
What you can do:
- Choose from 10 professional JPG background templates
- Upload your own JPG or PNG background image as a credential canvas (Pro)
- Add and position text, labels, and dynamic data tokens
- Insert decorative SVG elements, icons, ribbons, and line dividers
- Upload your own images — logos, signatures, seals (Pro)
- Save multiple named designs and switch between them
- Generate PDFs for one credential or hundreds at once
Available on: All plans (Free: 1 design, 1 template; Basic: 5 designs, all templates; Pro: unlimited + custom backgrounds)
Design Studio vs the Legacy Generator
CertLister has two PDF generation methods. The Design Studio is the recommended option for all new work.
| Design Studio | Legacy Generator | |
|---|---|---|
| Templates | 10 JPG backgrounds + custom uploads (Pro) | 3 classic SVG templates |
| Customization | Full visual editor | Template choice only |
| Bulk generation | Yes (Basic & Pro) | One at a time |
| Custom attribute tokens | Yes (Pro) | Basic support |
| Uploaded images | Yes (Pro) | No |
| Custom background images | Yes (Pro) | No |
| Recommended | Yes | For existing legacy designs only |
The legacy generator remains available and is described in a separate help article. If you are starting fresh, use the Design Studio.
How to Open the Design Studio
- Log into CertLister at https://app.certlister.com
- Click Design Studio in the left navigation
- The Design Studio opens with your current or default design loaded
Direct URL: https://app.certlister.com/credentials/generator
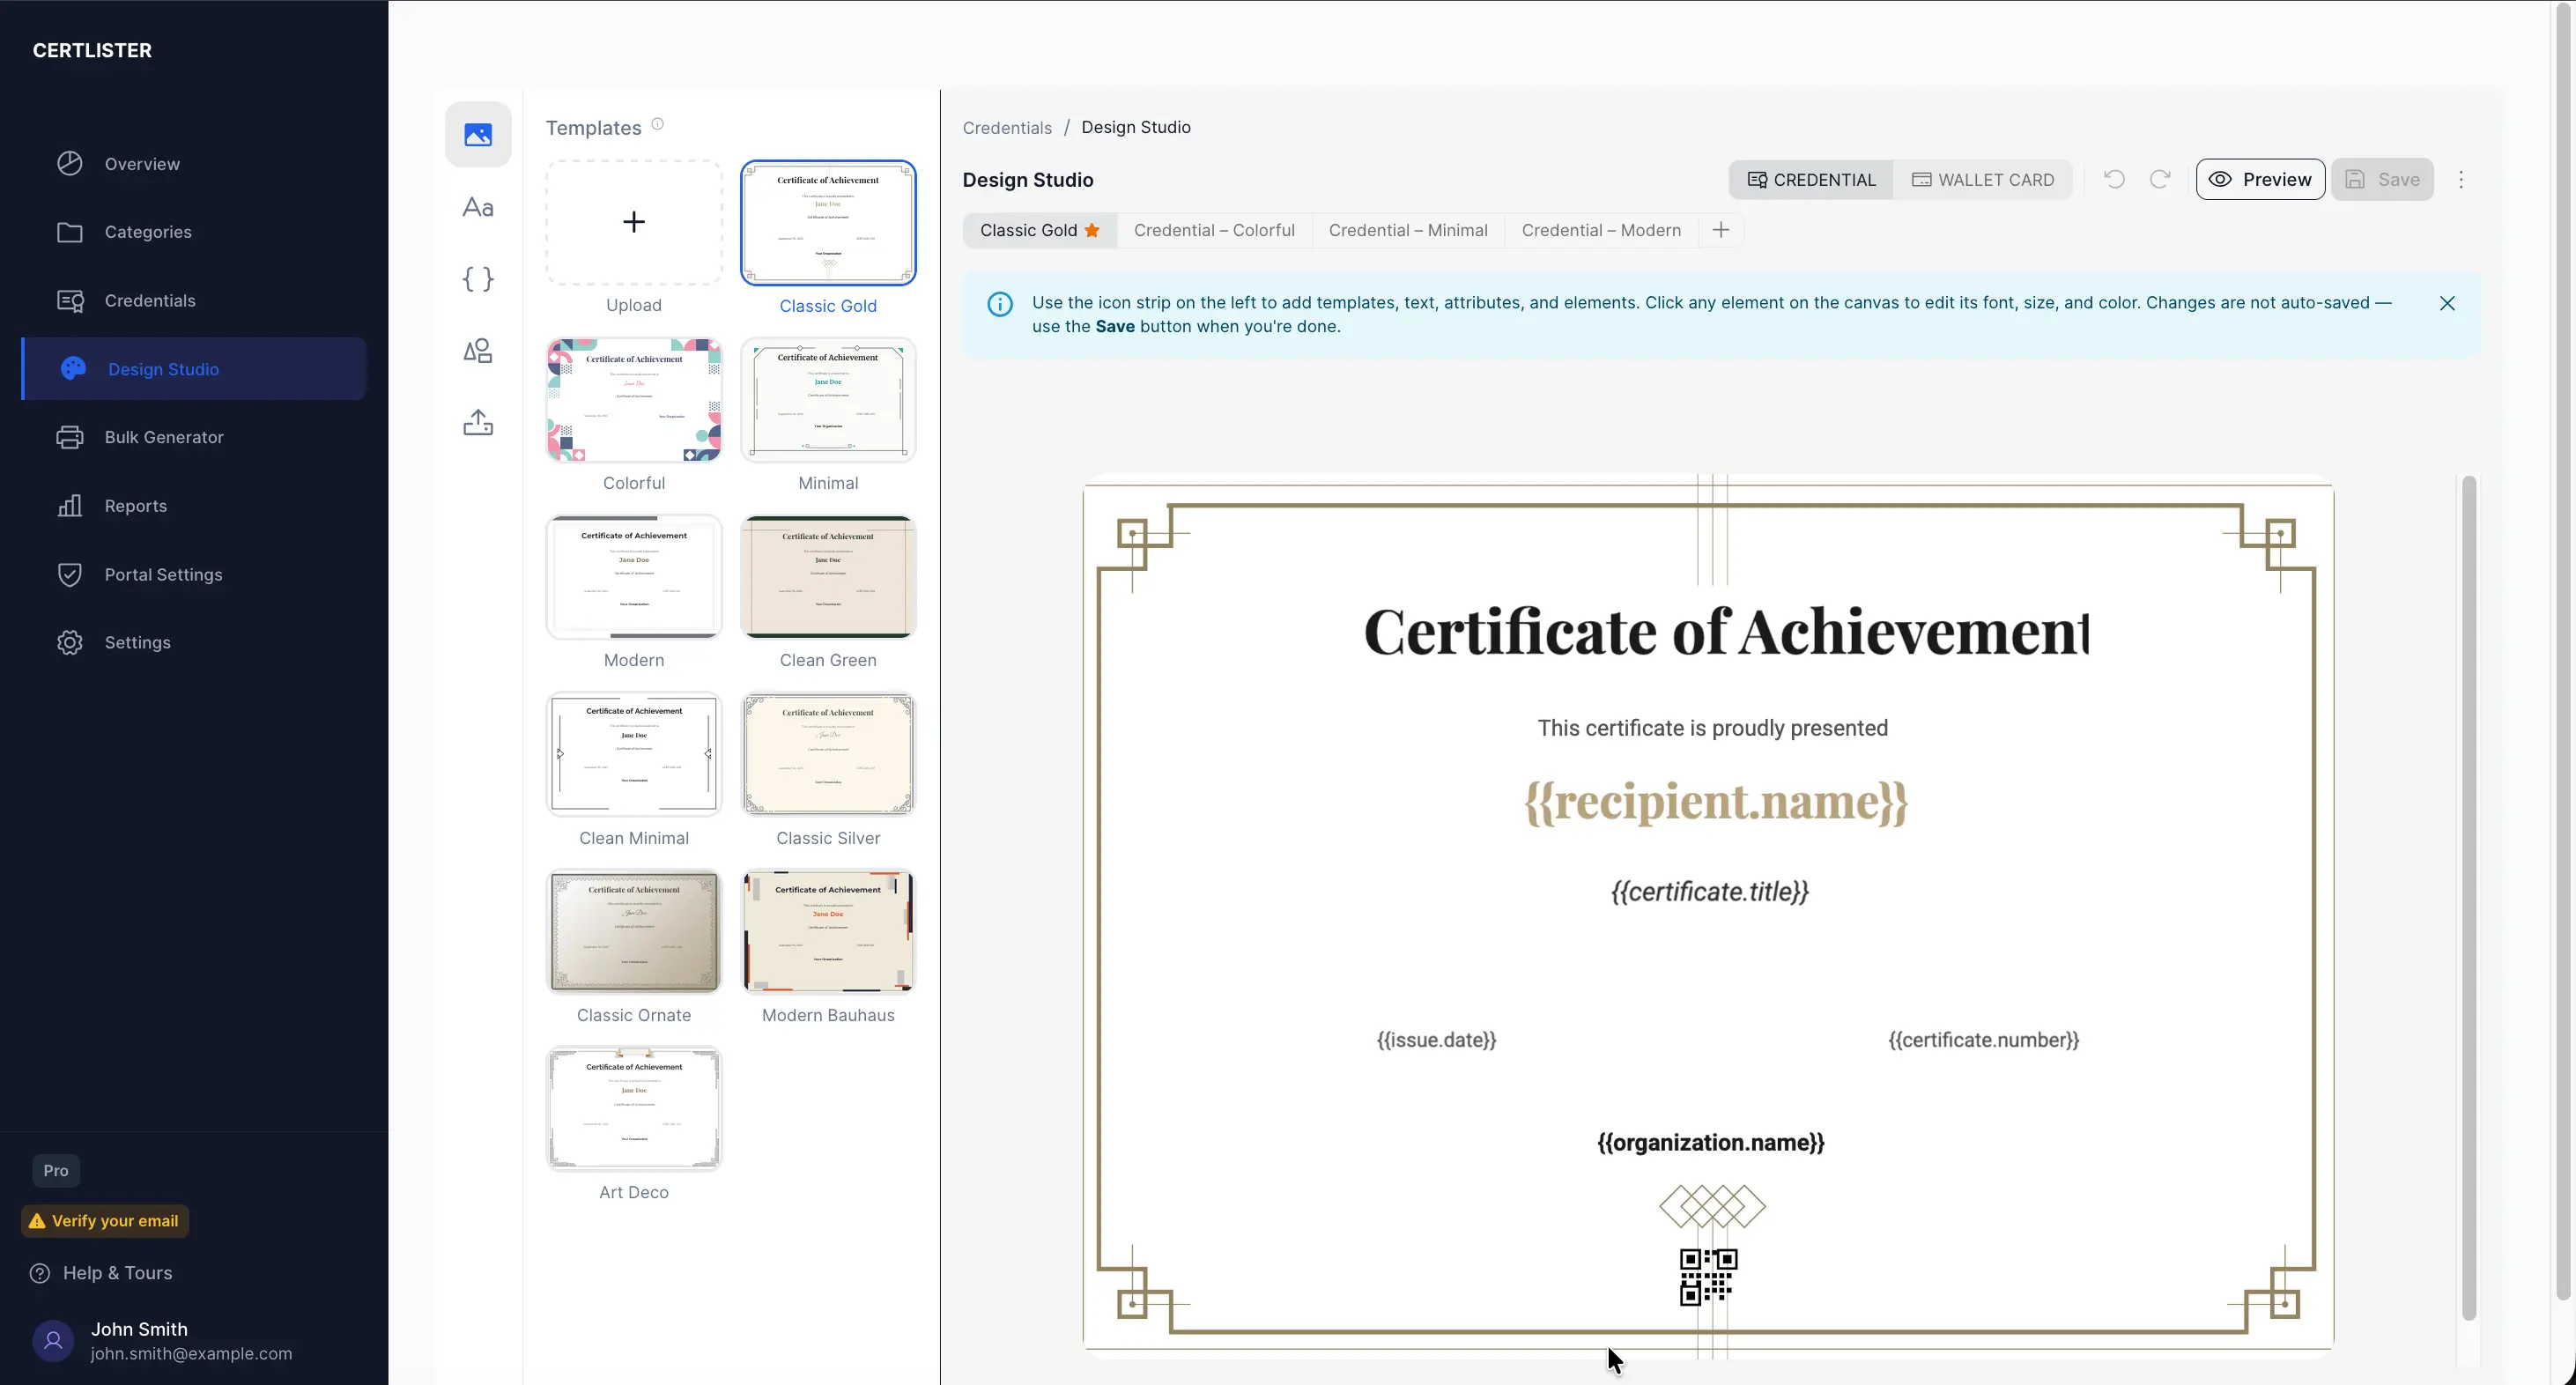
The Three-Panel Layout
The Design Studio is organized into three areas:
1. Tools Sidebar (far left, narrow) A vertical strip of icons for switching active tools:
- Templates — Choose a background
- Text — Add and style text elements
- Attributes — Insert dynamic credential data tokens
- Elements — Add decorative SVG shapes, icons, ribbons, and line dividers
- Uploads — Add your own images (Pro)
2. Selection Panel (left, wider) Shows options for the currently active tool — for example, the Text tool shows font, size, colour, and alignment controls.
3. Canvas (centre) Your live design. Click any element to select it. Drag elements to reposition them. Drag corner handles to resize.
Step 1: Choose a Background Template
- Click the Templates icon (top of the left toolbar)
- The Selection Panel shows 10 background options:
| Template ID | Name | Style | Best for |
|---|---|---|---|
| Classic-01 | Classic Gold | Gold geometric border, formal | Academic qualifications, professional certifications |
| Classic-02 | Classic Silver | Grey scrollwork border, cream background | Traditional or conservative organizations |
| Classic-03 | Classic Ornate | Silver filigree border, gradient background | Formal awards and professional licences |
| Elegant-01 | Colorful | Colourful abstract corners, contemporary | Workshops, creative or modern brands |
| Elegant-02 | Minimal | Thin border with diamond ornaments, minimal | Clean, understated awards |
| Elegant-03 | Art Deco | Grey geometric border, ribbon banner top | Stylized or premium-branded credentials |
| Modern-01 | Modern | Grey bars with rose-gold inner border, corporate | Business training programs, compliance certifications |
| Modern-02 | Modern Bauhaus | Navy/orange geometric, diagonal lines | Tech companies and design-forward organizations |
| Clean-01 | Clean Green | Dark green borders, beige interior | Environmental, health, or sustainability programs |
| Clean-02 | Clean Minimal | Thin black lines, diamond accents | Minimalist designs, executive education |
- Click a template thumbnail to apply it to the canvas instantly
Plan note: Classic-01 is available on all plans. Templates 2–10 require a Basic or Pro plan. Free plan users will see a lock icon on those templates.
Uploading Your Own Background (Pro)
If none of the built-in templates fit your brand, you can upload a custom JPG or PNG background image.
How to upload:
- Click the Templates icon in the left toolbar
- The My Templates section appears at the top of the panel (Pro plans only)
- Click the + upload card
- Select a JPG or PNG file — maximum 5 MB
- The image is uploaded to your organization's private storage and appears as a thumbnail in the gallery
- Click the thumbnail to apply it as the canvas background
Image requirements:
- Format: JPG or PNG only (no SVG — backgrounds must be raster images)
- Maximum size: 5 MB
- Recommended resolution: 2480 × 1754 px (A4 landscape at 300 DPI)
- Aspect ratio: Approximately 1.41:1 (same as A4 paper). Images with a different aspect ratio will be stretched to fill the canvas and may appear distorted
Tip: Click the (i) info icon next to "My Templates" to see a reminder of these requirements at any time.
Deleting a custom background:
Hover over any custom template thumbnail and click the trash icon that appears. If any saved designs reference that background, a warning shows how many are affected. You can still delete it — affected designs will show an alert the next time they are opened, prompting you to choose a new background. Any previously generated PDFs are unaffected.
Downgrade note: If you downgrade from Pro to Basic or Free, you can no longer upload new custom backgrounds, but your existing uploads remain visible and usable.
Step 2: Add Text Elements
- Click the Text icon in the left toolbar
- In the Selection Panel, click one of three text styles to add it to the canvas:
- Heading — Large, prominent text. Use for the recipient name or credential title.
- Subheading — Medium text. Use for the course name, category, or organization.
- Body — Smaller supporting text. Use for dates, descriptions, or fine print.
- The element appears on the canvas — drag it to the position you want
- Double-click the element on the canvas to edit its text content directly
- Use the font, size, colour, and alignment controls in the Selection Panel to style it
Available fonts: Playfair Display, Roboto, Open Sans, Lato, Montserrat, Merriweather, Oswald, Raleway, Dancing Script, Great Vibes
Step 3: Insert Credential Attribute Tokens
Attribute tokens are dynamic placeholders that are replaced with real credential data when a PDF is generated. For example, {{recipient.name}} becomes "Sarah Johnson" in the final PDF.
- Click the Attributes icon in the left toolbar
- The Selection Panel shows two sections:
Verification QR Code
At the top of the panel, there is a Verification QR Code element. Click it or drag it onto the canvas to add a QR code to your design.
At generation time, the QR code is automatically replaced with a real QR code that links directly to that credential's public verification page. Anyone who scans it with a phone can instantly verify the credential — no typing required.
- Add it to your design once; each generated PDF gets its own unique QR code
- Resize and reposition it like any other element
- Works on all plans — no upgrade required
Dynamic Fields
| Token | What it inserts |
|---|---|
{{recipient.name}} | Recipient's full name |
{{certificate.title}} | Credential title |
{{issue.date}} | Issue date |
{{expiry.date}} | Expiry date (blank if none) |
{{certificate.number}} | Unique credential number |
{{organization.name}} | Your organization name |
{{category.name}} | Credential category name |
{{custom.fieldkey}} | Custom attribute value (Pro) |
- Click a token button to add it to the canvas at a default position, or drag the button directly onto the canvas where you want it
- Style the token element like any other text element — font, size, colour, alignment
Tip: Place {{recipient.name}} as a large Heading. It is the most prominent piece of information on most credential designs.
Custom attributes are a Pro feature. See the Custom Credential Attributes help article for a full guide.
Step 4: Add Decorative Elements
- Click the Elements icon in the left toolbar
- Browse the panel:
- Icons & Ribbons — Award icons, ribbon shapes, badges, seals
- Shapes — Geometric shapes and frames
- Lines — Horizontal or vertical line dividers to structure your design
- Click an element to add it to the canvas, or drag it to a specific position
- For SVG elements, use the colour picker in the panel to change the element's colour to match your brand
Tip: A horizontal line divider between the credential title and the recipient name gives the design a clean, structured look.
Step 5: Upload Your Own Images (Pro)
- Click the Uploads icon in the left toolbar
- Click Upload Image and select a JPG, PNG, or SVG file (max 2 MB per file)
- The uploaded image appears in your gallery and persists across sessions
- Click the image thumbnail to add it to the canvas, or drag it directly onto the canvas
Common uses: Organization logos, signature images, official seals, stamps, watermarks
Requires Pro plan. Basic and Free plan users see a lock icon on the Uploads panel.
Working with Elements on the Canvas
Once elements are on the canvas:
- Move: Click and drag to reposition
- Resize: Drag the corner or edge handles
- Select: Click any element to select it (handles appear around it)
- Delete: Select an element, then click Delete Element in the Selection Panel — or press the Delete/Backspace key
- Layer order: Elements placed later appear in front. If elements overlap and you need to reorder them, delete and re-add the element in the correct order
Managing Multiple Designs
Your organization can save multiple named designs and use different ones for different credential types.
Switching Between Designs
- Click the design name dropdown in the top header bar
- Select any saved design to load it on the canvas
Creating a New Design
- Click the design name dropdown
- Select New Design
- Enter a name (e.g., "Annual Award 2026", "CPR Certification Template")
- Start with a blank canvas or choose a background template
Renaming, Duplicating, or Deleting a Design
Click the overflow menu (three dots) next to the design name dropdown to access:
- Rename — Update the design name
- Save as New — Duplicate the current design under a new name
- Set as Default — Mark this design as the default (used for bulk PDF generation)
- Delete — Permanently remove the design (requires at least one design to remain)
Unsaved Changes
An orange dot appears next to the design name when there are unsaved changes. If you try to leave the page, the browser will warn you. Click Save before navigating away.
Design Limits by Plan
| Plan | Saved designs |
|---|---|
| Free | 1 |
| Basic | 5 |
| Pro | Unlimited |
Saving Your Design
Click Save in the top right corner of the header. A confirmation message appears when the design is saved successfully.
Note: Only Admin users can create, edit, or delete designs. Manager and User roles can view designs but cannot save changes.
Generating PDFs from Your Design
Once your design is saved, use it to generate credential PDFs.
Single Credential PDF
- Go to Credentials
- Find the credential you want
- Click the Generate PDF action (or use the credential's action menu)
- Select your design from the picker
- Click Generate — the PDF is created and attached to the credential record
Bulk PDF Generation (Basic & Pro)
The easiest way to generate PDFs in bulk is via the dedicated Generate PDFs page:
- Click Generate PDFs in the left navigation sidebar
- Step 1 — Select the credentials you want (all credentials missing a PDF are pre-selected)
- Step 2 — Choose a design from your saved designs
- Step 3 — Review the summary and click Generate — a live progress bar tracks each PDF
See the Generate PDFs guide for full details.
You can also trigger bulk generation directly from the Credentials list:
- Go to Credentials
- Check the boxes next to the credentials you want
- Click Generate PDFs in the bulk action bar that appears
- Select a design and click Generate
Troubleshooting
Changes are not saving
- Click Save in the top right before navigating away
- Check for the orange unsaved-changes dot next to the design name
- Confirm you have the Admin role — Managers and Users cannot save design changes
A template shows a padlock icon
- That template requires a Basic or Pro plan
- Upgrade at https://app.certlister.com/billing
Custom attribute tokens show as [fieldname] in the canvas preview
This is normal. The design preview has no real credential data, so {{custom.score}} is shown as [score] as a placeholder. When you generate an actual PDF, the placeholder is replaced with the real value (e.g., "92%").
The Uploads panel shows a lock icon
- Image uploads require a Pro plan
- Upgrade at https://app.certlister.com/billing
My custom background looks stretched or squashed
- The canvas is always 2480 × 1754 px (A4 landscape). If your uploaded image has a different aspect ratio, it will be stretched to fill the canvas
- Re-upload the image at 2480 × 1754 px, or crop it to a 1.41:1 ratio (same as A4) before uploading
A design shows "The background image for this design was deleted"
- A custom background template that this design referenced has been deleted
- Open the Templates panel and choose a new background — your existing text and elements are preserved
- Save the design to confirm the new background
The "My Templates" upload card shows a lock icon
- Uploading custom backgrounds requires a Pro plan
- Click the card to go to the billing page to upgrade
Text is cut off in the generated PDF
- The text element on the canvas may be too narrow for the font size
- Select the element and widen it or reduce the font size
- Re-generate the PDF after saving the design change
Generated PDF looks slightly different from the canvas preview
Minor font rendering differences between the canvas (browser) and the PDF engine are normal. The preview is approximately 95–98% accurate. Always download and review a sample PDF before bulk generating.
Frequently Asked Questions
Q: Does the QR code on the PDF link to the right credential?
A: Yes. Each generated PDF gets its own unique QR code pointing to that specific credential's verification page. Scanning it with a phone opens the public verification page with the credential details pre-loaded — no manual searching required. The QR code is generated at PDF creation time and uses the correct URL for whichever environment you're running on (staging or production).
Q: Can I use the Design Studio on the Free plan?
A: Yes. Free plan includes one saved design and access to the Classic-01 background template. Upgrading to Basic unlocks all 10 background templates and up to 5 saved designs. Pro gives you unlimited designs and all templates.
Q: Can multiple team members edit the same design at the same time?
A: The Design Studio does not currently lock designs for exclusive editing. If two Admin users save the same design simultaneously, one save will overwrite the other. Coordinate with your team to avoid this.
Q: What fonts are available?
A: 10 fonts are loaded from Google Fonts: Playfair Display, Roboto, Open Sans, Lato, Montserrat, Merriweather, Oswald, Raleway, Dancing Script, Great Vibes.
Q: Can I import my own fonts?
A: Not currently. Only the 10 built-in fonts are available.
Q: What image formats can I upload?
A: JPG, PNG, and SVG — up to 2 MB per file. Pro plan required.
Q: Can I export a design to use outside CertLister?
A: Not currently. Designs are used only within CertLister to generate credential PDFs.
Q: Do I need design experience to use the Design Studio?
A: No. Start by choosing a background template, then drag the standard attribute tokens onto the canvas. Most organizations have a working design in under 15 minutes.
Q: What canvas resolution do generated PDFs use?
A: The canvas is 2480 × 1754 pixels — A4 landscape at 300 DPI — producing print-quality PDFs.
Q: Can I upload my own background image?
A: Yes, on Pro plans. Go to the Templates panel and click the + card in the "My Templates" section. Upload a JPG or PNG up to 5 MB. For best results, use an image that is exactly 2480 × 1754 px — the canvas dimensions. Images with a different aspect ratio will be stretched to fit.
Q: What happens to designs that used a deleted custom background?
A: The design is not deleted — only the background reference is cleared. The next time the design is opened, an amber alert will appear asking you to choose a new background. Your existing text elements and layout are fully preserved. Previously generated PDFs are not affected — they are stored as independent files.