
Drafts: Save Participants Before You Issue
Time to read: 5 minutes
Overview
Drafts let you record a participant the moment they enroll, without issuing their credential yet. A typical case: a student signs up for a course in January, but the credential shouldn't exist until the course ends in June. Save them as a draft now, then issue with one click when the time comes. Drafts sit alongside the rest of the credential management features.
Drafts live in the same Credentials table as your issued credentials, marked with a Draft status chip.
| Plan | All plans |
| Credits | Drafts are free — a credit is only used when you issue |
| Required fields | Name and category |
| Optional fields | Email, title, expiry date, description, custom fields |
| Visibility | Internal only — drafts never appear on your public verify page, in reports, or in exports |
Save a Draft
- Click Credentials in the left navigation
- Click New credential (top right) — the Issue credential drawer slides in from the right
- Fill in at least the recipient's Name and pick a Category — email, title, expiry date, description, and any custom fields are optional and can be completed later
- Click Save as draft
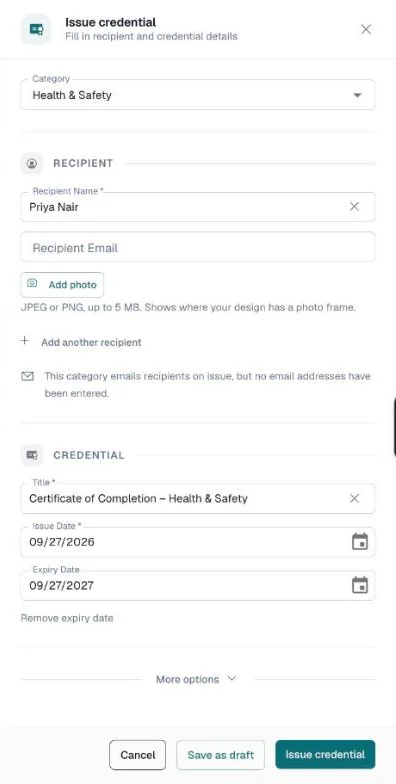
The drawer closes, a Draft saved message appears, and the participant is in the table as a Draft row.
A few things to know:
- A draft keeps its expiry date, not its issue date. If the category sets a default expiry, or you pick one, the draft stores it along with the Send expiry reminder email choice. The issue date is set when you actually issue.
- Several people at once: click Add another recipient to add more names before saving. One click on Save as draft saves each recipient as its own draft row — handy when entering a whole enrollment sheet in one sitting.
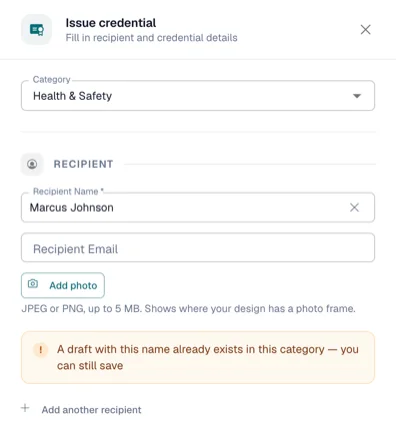
- Duplicate warning: if a draft with the same name already exists in the chosen category — with the same email, or with no email on one side — you'll see a hint: "A draft with this name already exists in this category — you can still save." It never blocks you. People who share one email address — for example, a manager who receives everyone's credentials — are told apart by their names, so they don't trigger it, and neither do two people with the same name and different emails.
- Out of credits? You can still save drafts. Running out of credits gates issuing, not enrollment — queue up as many drafts as you need and issue once you've topped up or upgraded.
Find and Edit Drafts
In the Status filter above the Credentials table, select Draft. The toggle shows a count badge whenever you have pending drafts, so you always know how many people are waiting to be issued.
Draft rows are easy to spot: a Draft status, slightly dimmed text, and blank cells in the columns that only apply after issuance — Credential Number, Issue Date, and Email Status. The expiry date shows if the draft has one.
A draft row's ⋯ menu has three actions: Issue, Edit, and Remove.
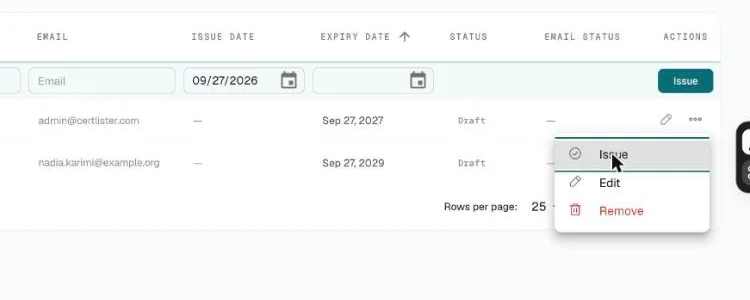
To edit a draft, choose Edit. The drawer opens pre-filled with everything you saved. Click Save as draft to update it — the same draft is re-saved, nothing is duplicated.
Issue a Draft
When it's time to make it real:
- Open the draft row's ⋯ menu and click Issue
- The Issue credential drawer opens pre-filled with the participant's details, including the expiry date
- Add anything that was missing and check the issue date
- Click Issue credential
The draft is converted into a real credential, linked back to the original entry, and the row's status changes from Draft to Active. On metered plans, this is the moment a credit is used — never earlier.
Issue Several Drafts at Once
- Filter the table by Draft status
- Tick the checkboxes of the drafts you want to issue
- Click Issue selected (N) in the bulk bar
- The drawer opens with all selected participants as recipients — check the shared details and click Issue N credentials
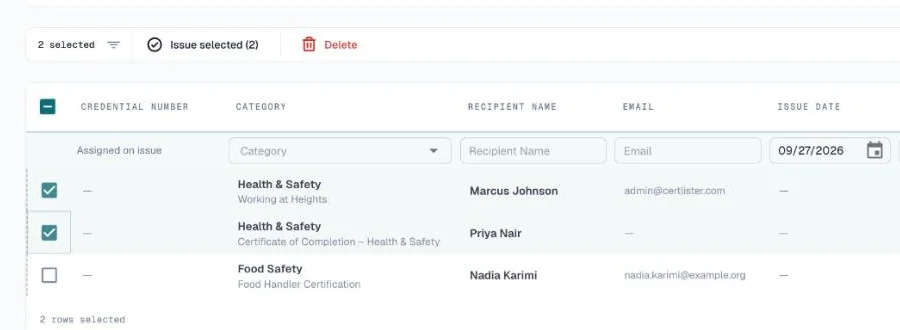
If the drafts all have the same expiry date, the drawer fills it in. If they differ, it leaves the field empty and says so — a date you set there applies to all of them.
Two rules to be aware of:
- One category at a time. If your selection spans more than one category, Issue selected is disabled and its tooltip says "Select drafts from a single category to issue them together." Filter by category first, or issue each group separately.
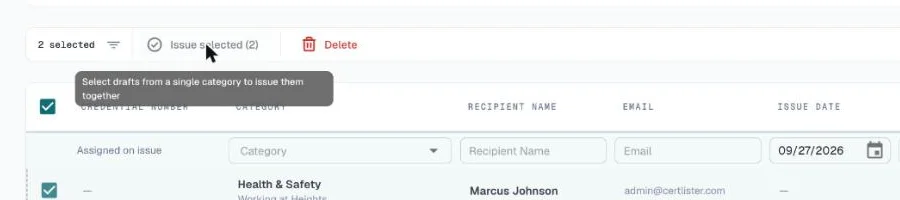
- Don't mix drafts and issued credentials. If your selection contains both, a notice says bulk actions aren't available — clear the selection and pick one type.
If you run out of credits mid-batch: the credentials that fit within your remaining credits are issued, and the rest simply stay as drafts. Nothing is lost — buy a credit pack or upgrade, then select the remaining drafts and issue them.
Return a Credential to Draft
Issued something by mistake — wrong recipient, wrong batch, or the button pressed a week early? Return to draft undoes it. Open the credential's ⋯ menu and choose Return to draft, or select several rows and use the bulk action.
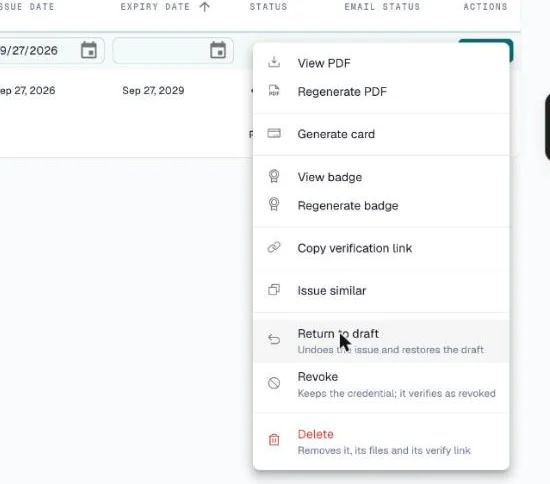
The credential is deleted, its details go back into your roster as a draft, and the credit it used is returned to your balance if it came from this month's allowance or a purchased pack. You can correct whatever was wrong and issue again when you're ready.
| Plan | All plans, single and bulk |
| Credits | The credit spent on issuing is refunded if it came from this month's allowance or a purchased pack |
| Available when | The recipient has not been emailed this credential |
This is not a silent undo. The confirmation dialog spells out what disappears:
- The credential number is permanently retired. CertLister never gives it out again, so on sequential numbering your sequence will show a gap. That is deliberate — a number that was once live should never point at something else later. Don't type it back in by hand: nothing stops a typed number from reusing it.
- The issue date.
- The PDF, wallet card, badge, and any recipient photo.
- The email and verification history.
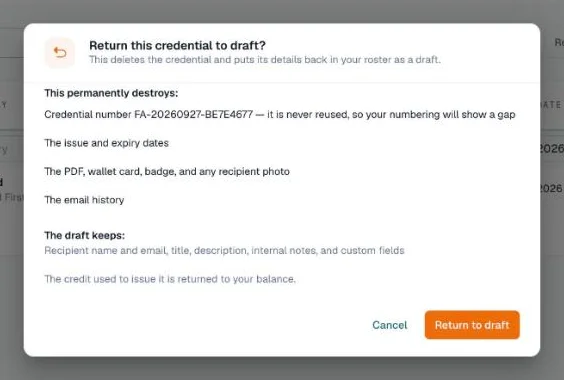
The draft keeps the recipient's name and email, the title, description, internal notes, custom fields, and the expiry date with its reminder choice.
The verify link stops working. Anyone who opens that credential's verify URL afterwards sees "not found". If the credential has already been looked up, the dialog tells you how many times so you can decide with that in mind.
When it isn't offered
Once the recipient has been emailed the credential, Return to draft disappears from the menu. At that point they have the link in their inbox, and quietly deleting it would break a promise already made — revoke it instead, which keeps the record and shows a clear "revoked" status to anyone who checks.
Two other cases behave gently rather than blocking:
- A revoked credential can still be returned to draft. The dialog warns you first, since anyone checking the link today sees "revoked" and will see "not found" afterwards.
- A credential whose category was deleted has nowhere to file its draft, so the dialog asks you to pick one before it will continue. In bulk, those rows are skipped and reported rather than stopping the whole batch.
Which action do I want?
| Keeps the record | Verify link | Credit | Use when | |
|---|---|---|---|---|
| Return to draft | Yes — as a draft | Stops working | Refunded* | Issued by mistake, recipient not yet emailed |
| Revoke | Yes — marked revoked | Shows "revoked" | Not refunded | The credential was real but is no longer valid |
| Delete | No — gone | Stops working | Refunded* | You want no trace of it at all |
* If the credit came from this month's allowance or a purchased pack. A credit from an earlier month's allowance has already expired, so it does not come back.
Remove a Draft
Open the draft row's ⋯ menu and choose Remove, or select several drafts and click Delete in the bulk bar. Removing a draft is permanent and involves no credits — nothing was ever issued.
Two related behaviors worth knowing:
- Deleting a category also removes its drafts. The confirmation dialog warns you how many unissued drafts will be removed along with it.
- Deleting an issued credential does not bring its draft back. Delete means delete: the link to the original draft is removed and the draft is not restored. If what you actually want is the person back on your roster so you can fix something and re-issue, use Return to draft instead — that is exactly what it is for.
FAQ
Q: Do drafts appear on my public verify page?
A: No. Drafts are internal to your organization. They never show up in verify searches, reports, CSV exports, or anywhere a recipient or third party could see them.
Q: Do drafts use credits or count against my plan limit?
A: No. A credit is used only at the moment you issue. You can save drafts freely even when you've used all your credits.
Q: Can I set an issue or expiry date on a draft?
A: You can set the expiry date — the draft keeps it, with the expiry reminder choice. The issue date is set when you issue.
Q: Can two drafts have the same name or email?
A: Yes. Saving is always allowed. You'll see a non-blocking hint only when a draft with the same name exists and the emails match or one of them is blank. People who share one email but have different names don't trigger it.
Q: I deleted a credential that was issued from a draft. Where did the draft go?
A: It's gone — Delete removes the link to the original draft and does not restore it. If you wanted the person back on your roster to fix something and re-issue, the action you needed is Return to draft, which puts their details back as a draft and refunds the credit if it came from this month's allowance or a purchased pack.
Q: I issued a credential to the wrong person. Can I undo it?
A: Yes, as long as they haven't been emailed it — use Return to draft on the row. The credential is deleted, the details return to your roster as a draft, and the credit comes back if it came from this month's allowance or a purchased pack. CertLister never gives the credential number out again. If the recipient has already been emailed, revoke it instead.
Q: Why has Return to draft disappeared from a credential's menu?
A: Because that credential has been emailed to its recipient. They already have the link, so the recoverable path is closed and revoking is the honest option. It is also hidden on rows that are already drafts.
Q: How do I turn a draft into a credential for someone who's on the roster but selected with others from another category?
A: Bulk issuing works one category at a time. Filter the table by category, select the drafts within it, and click Issue selected — then repeat for the next category.